How does secondary GIE crop and resize objects?

SGIE will crop the object from NvStreamMux buffer using the object’s bbox detected by the Primary GIE.

The crop is then scaled/converted to the network resolution/color format.

For example, if the NvStreamMux resolution is 1920x1080, SGIE will crop using object bbox co-ordinates

(e.g. x=1000, y=20, w=400, y=500) from the 1920x1080 image and then scale it to the SGIE network resolution (say 224x224).

In practice, the object crop + scaling + color conversion happens in one go.


How to save frames from GstBuffer?

To save frames from gst buffer you need to Map gst buffer using gst_buffer_map () API.

Here is the pseudo code:

GstMapInfo in_map_info;
NvBufSurface *surface = NULL;

memset(&in_map_info, 0, sizeof(in_map_info));
if (!gst_buffer_map(inbuf, &in_map_info, GST_MAP_READ)) {
    g_print ("Error: Failed to map gst buffer\n");
}
surface = (NvBufSurface*)in_map_info.data;

Now that you have access to NvBufSurface structure, you can access actual frame memory and save it.

At the end you need to unmap gst buffer using gst_buffer_unmap (inbuf, &in_map_info)

For more details, see gst_dsexample_transform_ip() in gst-dsexample plugin source code.


'C, C++ > DeepStream' 카테고리의 다른 글

Install DeepStream 6.1.1 on WSL2  (0) 2022.11.08

Reference:

https://www.linuxfromscratch.org/blfs/view/svn/general/libjpeg.html


libjpeg-turbo-2.1.4

Installed Programs: cjpeg, djpeg, jpegtran, rdjpgcom, tjbench, and wrjpgcom Installed Libraries: libjpeg.so and libturbojpeg.so Installed Directories: /usr/share/doc/libjpeg-turbo-2.1.4

www.linuxfromscratch.org


$ sudo apt install cmake


Download

https://downloads.sourceforge.net/libjpeg-turbo/libjpeg-turbo-2.1.4.tar.gz


Download libjpeg-turbo from SourceForge.net


sourceforge.net

$ wget https://downloads.sourceforge.net/libjpeg-turbo/libjpeg-turbo-2.1.4.tar.gz
$ tar -xvf libjpeg-turbo-2.1.4.tar.gz
$ cd libjpeg-turbo-2.1.4/

$ mkdir build
$ cd build

$ cmake -DCMAKE_INSTALL_PREFIX=/usr \
        -DCMAKE_BUILD_TYPE=RELEASE  \
        -DENABLE_STATIC=FALSE       \
        -DCMAKE_INSTALL_DOCDIR=/usr/share/doc/libjpeg-turbo-2.1.4 \
        -DCMAKE_INSTALL_DEFAULT_LIBDIR=lib  \
        ..

$ make

$ sudo make install
...
Install the project...
-- Install configuration: "RELEASE"
-- Installing: /usr/lib/libturbojpeg.so.0.2.0
-- Installing: /usr/lib/libturbojpeg.so.0
-- Set runtime path of "/usr/lib/libturbojpeg.so.0.2.0" to "/usr/lib"
-- Installing: /usr/lib/libturbojpeg.so
-- Installing: /usr/bin/tjbench
-- Set runtime path of "/usr/bin/tjbench" to "/usr/lib"
-- Installing: /usr/include/turbojpeg.h
-- Installing: /usr/bin/rdjpgcom
-- Set runtime path of "/usr/bin/rdjpgcom" to "/usr/lib"
-- Installing: /usr/bin/wrjpgcom
-- Set runtime path of "/usr/bin/wrjpgcom" to "/usr/lib"
-- Installing: /usr/share/doc/libjpeg-turbo-2.1.4/README.ijg
-- Installing: /usr/share/doc/libjpeg-turbo-2.1.4/README.md
-- Installing: /usr/share/doc/libjpeg-turbo-2.1.4/example.txt
-- Installing: /usr/share/doc/libjpeg-turbo-2.1.4/tjexample.c
-- Installing: /usr/share/doc/libjpeg-turbo-2.1.4/libjpeg.txt
-- Installing: /usr/share/doc/libjpeg-turbo-2.1.4/structure.txt
-- Installing: /usr/share/doc/libjpeg-turbo-2.1.4/usage.txt
-- Installing: /usr/share/doc/libjpeg-turbo-2.1.4/wizard.txt
-- Installing: /usr/share/doc/libjpeg-turbo-2.1.4/LICENSE.md
-- Installing: /usr/share/man/man1/cjpeg.1
-- Installing: /usr/share/man/man1/djpeg.1
-- Installing: /usr/share/man/man1/jpegtran.1
-- Installing: /usr/share/man/man1/rdjpgcom.1
-- Installing: /usr/share/man/man1/wrjpgcom.1
-- Installing: /usr/lib/pkgconfig/libjpeg.pc
-- Installing: /usr/lib/pkgconfig/libturbojpeg.pc
-- Installing: /usr/lib/cmake/libjpeg-turbo/libjpeg-turboConfig.cmake
-- Installing: /usr/lib/cmake/libjpeg-turbo/libjpeg-turboConfigVersion.cmake
-- Installing: /usr/lib/cmake/libjpeg-turbo/libjpeg-turboTargets.cmake
-- Installing: /usr/lib/cmake/libjpeg-turbo/libjpeg-turboTargets-release.cmake
-- Installing: /usr/include/jconfig.h
-- Installing: /usr/include/jerror.h
-- Installing: /usr/include/jmorecfg.h
-- Installing: /usr/include/jpeglib.h
-- Installing: /usr/lib/libjpeg.so.62.3.0
-- Installing: /usr/lib/libjpeg.so.62
-- Set runtime path of "/usr/lib/libjpeg.so.62.3.0" to "/usr/lib"
-- Installing: /usr/lib/libjpeg.so
-- Installing: /usr/bin/cjpeg
-- Set runtime path of "/usr/bin/cjpeg" to "/usr/lib"
-- Installing: /usr/bin/djpeg
-- Set runtime path of "/usr/bin/djpeg" to "/usr/lib"
-- Installing: /usr/bin/jpegtran
-- Set runtime path of "/usr/bin/jpegtran" to "/usr/lib"


$ whereis *jpeg*
cjpeg: /usr/bin/cjpeg /usr/share/man/man1/cjpeg.1
djpeg: /usr/bin/djpeg /usr/share/man/man1/djpeg.1
jpegtran: /usr/bin/jpegtran /usr/share/man/man1/jpegtran.1
libjpeg: /usr/lib/libjpeg.so
libjpeg.so: /usr/lib/x86_64-linux-gnu/libjpeg.so.8 /usr/lib/libjpeg.so.62 /usr/lib/libjpeg.so
libjpeg.so.62.3: /usr/lib/libjpeg.so.62.3.0
libturbojpeg: /usr/lib/libturbojpeg.so
libturbojpeg.so: /usr/lib/libturbojpeg.so /usr/lib/libturbojpeg.so.0
libturbojpeg.so.0.2: /usr/lib/libturbojpeg.so.0.2.0

'OS > Linux' 카테고리의 다른 글

CUDA 11.7.1 on WSL2  (0) 2022.11.13
Fastest way to check if a file exists  (0) 2022.11.10
CUDA-11.4 on WSL2  (0) 2022.10.12
Ubuntu에서 GPG ERROR NO_PUBKEY 해결방법  (0) 2022.10.11
CMake Install  (0) 2022.10.01

https://www.msys2.org/


MSYS2

Software Distribution and Building Platform for Windows

www.msys2.org


1. Open MSYS2 shell from start menu

2. Run ... to update the package database

$ pacman -Sy pacman

3. Re-open the shell, run ... to update the package database and core system packages

$ pacman -Syu

4. Re-open the shell, run ... to update the rest

$ pacman -Su

5. Install compiler:

$ pacman -S mingw-w64-x86_64-toolchain

6. Select which package to install, default is all

7. You may also need make, run ...

$ pacman -S make

8. cmake

$ pacman -S mingw-w64-x86_64-cmake

'C, C++' 카테고리의 다른 글

xlnt - XLSX 파일 다루기  (0) 2022.12.22
문자열 구분자로 분리  (0) 2021.10.20
VSCode + vcpkg  (0) 2021.10.19
Get DLL path at run time  (0) 2021.10.05
ticktock  (0) 2021.08.15

0. Remove CUDA files

$ sudo apt-get remove --purge '^nvidia-.*'

$ sudo apt-get remove --purge 'cuda*'
$ sudo apt-get autoremove --purge 'cuda*'

$ sudo rm -rf /usr/local/cuda
$ sudo rm -rf /usr/local/cuda-#.#


1. Setting CUDA Toolkit on WSL2

$ wget https://developer.download.nvidia.com/compute/cuda/repos/wsl-ubuntu/x86_64/cuda-wsl-ubuntu.pin
$ sudo mv cuda-wsl-ubuntu.pin /etc/apt/preferences.d/cuda-repository-pin-600

$ wget https://developer.download.nvidia.com/compute/cuda/11.4.0/local_installers/cuda-repo-wsl-ubuntu-11-4-local_11.4.0-1_amd64.deb
$ sudo dpkg -i cuda-repo-wsl-ubuntu-11-4-local_11.4.0-1_amd64.deb
$ sudo apt-key add /var/cuda-repo-wsl-ubuntu-11-4-local/7fa2af80.pub

$ sudo apt-get update
$ sudo apt-get -y install cuda

설치 확인

$ cd /usr/local/cuda-11.4/samples/4_Finance/BlackScholes
$ sudo make BlackScholes
$ ./BlackScholes
[./BlackScholes] - Starting...
GPU Device 0: "Pascal" with compute capability 6.1

Initializing data...
...allocating CPU memory for options.
...allocating GPU memory for options.
...generating input data in CPU mem.
...copying input data to GPU mem.
Data init done.

Executing Black-Scholes GPU kernel (512 iterations)...
Options count             : 8000000
BlackScholesGPU() time    : 0.227898 msec
Effective memory bandwidth: 351.033566 GB/s
Gigaoptions per second    : 35.103357

BlackScholes, Throughput = 35.1034 GOptions/s, Time = 0.00023 s, Size = 8000000 options, NumDevsUsed = 1, Workgroup = 128

Reading back GPU results...
Checking the results...
...running CPU calculations.

Comparing the results...
L1 norm: 1.741792E-07
Max absolute error: 1.192093E-05

Shutting down...
...releasing GPU memory.
...releasing CPU memory.
Shutdown done.

[BlackScholes] - Test Summary

NOTE: The CUDA Samples are not meant for performance measurements. Results may vary when GPU Boost is enabled.

Test passed

Chane Repository

$ sudo nano /etc/apt/sources.list

Replace: Ctrl + \

Search (to replace): archive.ubuntu.com

Replace with: mirror.kakao.com

Save: Ctrl + s

Exit: Ctrl + x

확인

$ sudo apt update


개발환경 설정

1. PIP install

$ sudo apt-get install python3-pip
$ pip install --upgrade pip


2. Pytorch, Torchvision install

$ pip3 install torch torchvision torchaudio


3. OpenCV

$ pip install opencv-python


4. TensorRT

 - CUDA toolkit, PyCUDA

$ pip install numpy cupy

Kepler architecture 이상의 GPU 필요


- TensorRT C++

https://developer.nvidia.com/tensorrt


NVIDIA TensorRT

An SDK with an optimizer for high-performance deep learning inference.

developer.nvidia.com

$ wget https://developer.nvidia.com/compute/machine-learning/tensorrt/secure/8.4.3/local_repos/nv-tensorrt-repo-ubuntu1804-cuda11.6-trt8.4.3.1-ga-20220813_1-1_amd64.deb
$ sudo dpkg -i nv-tensorrt-repo-ubuntu1804-cuda11.6-trt8.4.3.1-ga-20220813_1-1_amd64.deb
(Reading database ... 71998 files and directories currently installed.)
Preparing to unpack nv-tensorrt-repo-ubuntu1804-cuda11.6-trt8.4.3.1-ga-20220813_1-1_amd64.deb ...
Unpacking nv-tensorrt-repo-ubuntu1804-cuda11.6-trt8.4.3.1-ga-20220813 (1-1) over (1-1) ...
Setting up nv-tensorrt-repo-ubuntu1804-cuda11.6-trt8.4.3.1-ga-20220813 (1-1) ...

위와 같이 설치하면 header 파일 및 lib 파일을 찾을 수 없음.

아래 링크의 TAR Package를 받아야 함

https://developer.nvidia.com/compute/machine-learning/tensorrt/secure/8.4.3/tars/tensorrt-8.4.3.1.linux.x86_64-gnu.cuda-11.6.cudnn8.4.tar.gz

$ tar -xvf TensorRT-8.4.3.1.Linux.x86_64-gnu.cuda-11.6.cudnn8.4.tar.gz
$ mv TensorRT-8.4.3.1 ~/dev/

include, lib 경로를 환경변수에 등록

$ sudo nano ~/.bashrc

...

export PATH=/usr/local/cuda/bin:$PATH
export LD_LIBRARY_PATH=/usr/local/cuda/lib64:/lib64:$LD_LIBRARY_PATH:~/dev/TensorRT-8.4.3.1/lib

bashrc 변경 적용 또는 재시작

$ source ~/.bashrc

TensorRT-8.4.3.1/python/ 폴더에서 현재 파이썬 버전에 맞는 패키지 설치

$ pip install tensorrt-8.4.3.1-cp36-none-linux_x86_64.whl
Defaulting to user installation because normal site-packages is not writeable
Processing ./tensorrt-8.4.3.1-cp36-none-linux_x86_64.whl
Installing collected packages: tensorrt
Successfully installed tensorrt-8.4.3.1

TensorRT-8.4.3.1/uff/ 폴더에서도 설치

$ cd ../uff/
$ pip install uff-0.6.9-py2.py3-none-any.whl
Defaulting to user installation because normal site-packages is not writeable
Processing ./uff-0.6.9-py2.py3-none-any.whl
Requirement already satisfied: protobuf>=3.3.0 in /home/ym/.local/lib/python3.6/site-packages (from uff==0.6.9) (3.17.3)
Requirement already satisfied: numpy>=1.11.0 in /home/ym/.local/lib/python3.6/site-packages (from uff==0.6.9) (1.19.5)
Requirement already satisfied: six>=1.9 in /home/ym/.local/lib/python3.6/site-packages (from protobuf>=3.3.0->uff==0.6.9) (1.15.0)
Installing collected packages: uff
Successfully installed uff-0.6.9

$ cd ../graphsurgeon/
$ pip install graphsurgeon-0.4.6-py2.py3-none-any.whl
Defaulting to user installation because normal site-packages is not writeable
Processing ./graphsurgeon-0.4.6-py2.py3-none-any.whl
Installing collected packages: graphsurgeon
Successfully installed graphsurgeon-0.4.6

$ cd ../onnx_graphsurgeon/
$ pip install onnx_graphsurgeon-0.3.12-py2.py3-none-any.whl
Defaulting to user installation because normal site-packages is not writeable
Processing ./onnx_graphsurgeon-0.3.12-py2.py3-none-any.whl
Collecting onnx
  Using cached onnx-1.12.0.tar.gz (10.1 MB)
  Preparing metadata (setup.py) ... done
Requirement already satisfied: numpy in /home/ym/.local/lib/python3.6/site-packages (from onnx-graphsurgeon==0.3.12) (1.19.5)
Requirement already satisfied: protobuf<=3.20.1,>=3.12.2 in /home/ym/.local/lib/python3.6/site-packages (from onnx->onnx-graphsurgeon==0.3.12) (3.17.3)
Requirement already satisfied: typing-extensions>=3.6.2.1 in /home/ym/.local/lib/python3.6/site-packages (from onnx->onnx-graphsurgeon==0.3.12) (3.7.4.3)
Requirement already satisfied: six>=1.9 in /home/ym/.local/lib/python3.6/site-packages (from protobuf<=3.20.1,>=3.12.2->onnx->onnx-graphsurgeon==0.3.12) (1.15.0)
Building wheels for collected packages: onnx
  Building wheel for onnx (setup.py) ... error

마지막 오류 해결해야 함...

- Protobuf 설치

$ pip3 install "protobuf>=3.11.0,<=3.20.1"

여전히 오류가 나지만... python에서 import tensorrt 문제 없음

$ sudo apt-get update
...
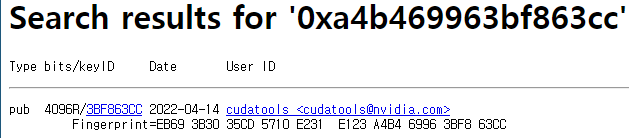
W: GPG error: http://developer.download.nvidia.com/compute/cuda/repos/ubuntu1804/x86_64  InRelease: The following signatures couldn't be verified because the public key is not available: NO_PUBKEY A4B469963BF863CC
E: The repository 'http://developer.download.nvidia.com/compute/cuda/repos/ubuntu1804/x86_64  InRelease' is not signed.
N: Updating from such a repository can't be done securely, and is therefore disabled by default.
N: See apt-secure(8) manpage for repository creation and user configuration details.

아래 사이트로 접속해 NO_PUBKEY 뒷 부분의 코드 앞에 '0x'를 붙여서 검색

MIT GPG KeyServer: http://pgp.mit.edu/ 


MIT PGP Key Server


pgp.mit.edu

pub 오른쪽 key ID 항목(3BF863CC) 복사해서 키 등록

$ sudo apt-key adv --keyserver keyserver.ubuntu.com --recv 3BF863CC
Executing: /tmp/apt-key-gpghome.8Pt4MWCK04/gpg.1.sh --keyserver keyserver.ubuntu.com --recv 3BF863CC
gpg: key A4B469963BF863CC: public key "cudatools <cudatools@nvidia.com>" imported
gpg: Total number processed: 1
gpg:               imported: 1

업데이트 확인

$ sudo apt-get update
Get:1 http://developer.download.nvidia.com/compute/cuda/repos/ubuntu1804/x86_64  InRelease [1581 B]
Hit:2 https://developer.download.nvidia.com/compute/cuda/repos/wsl-ubuntu/x86_64  InRelease
Ign:3 http://developer.download.nvidia.com/compute/machine-learning/repos/ubuntu1804/x86_64  InRelease
Get:4 http://developer.download.nvidia.com/compute/cuda/repos/ubuntu1804/x86_64  Packages [950 kB]
Hit:5 http://security.ubuntu.com/ubuntu bionic-security InRelease
Hit:6 http://developer.download.nvidia.com/compute/machine-learning/repos/ubuntu1804/x86_64  Release
Hit:8 http://archive.ubuntu.com/ubuntu bionic InRelease
Hit:9 http://archive.ubuntu.com/ubuntu bionic-updates InRelease
Hit:10 http://archive.ubuntu.com/ubuntu bionic-backports InRelease
Fetched 950 kB in 2s (582 kB/s)
Reading package lists... Done​

'OS > Linux' 카테고리의 다른 글

Install libjpeg-turbo  (0) 2022.11.06
CUDA-11.4 on WSL2  (0) 2022.10.12
CMake Install  (0) 2022.10.01
VSCode: ssh로 접근해서 편집된 파일 저장 시 permission 문제  (0) 2022.08.22
glib/streamer install  (0) 2021.11.15
$ git clone https://github.com/udhos/update-golang
cd update-golang
sudo ./update-golang.sh

사용하는 shell 확인

$ ls /home/{user} -alh
total 72K
drwxr-xr-x 9 ym   ym   4.0K Oct  4 10:45 .
drwxr-xr-x 3 root root 4.0K Aug 22 11:56 ..
-rw------- 1 ym   ym   6.5K Oct  4 11:32 .bash_history
-rw-r--r-- 1 ym   ym    220 Aug 22 11:56 .bash_logout
-rw-r--r-- 1 ym   ym   3.8K Oct  4 11:36 .bashrc
...​

환경변수 설정

$ sudo echo 'export PATH=$PATH:/usr/local/go/bin' >> ~/.bashrc


With Go 1.17 or later, the recommended way to install it is:

$ go install github.com/bazelbuild/bazelisk@latest
go: downloading github.com/bazelbuild/bazelisk v1.14.0
go: downloading github.com/mitchellh/go-homedir v1.1.0
go: downloading github.com/hashicorp/go-version v1.6.0
go: downloading github.com/bgentry/go-netrc v0.0.0-20140422174119-9fd32a8b3d3d

To add it to your PATH:

$ export PATH=$PATH:$(go env GOPATH)/bin

https://cmake.org/download/


Download | CMake

Current development distribution Each night binaries are created as part of the testing process. Other than passing all of the tests in CMake, this version of CMake should not be expected to work in a production environment. It is being produced so that us

cmake.org


최신 릴리즈 파일의 링크 복사

https://github.com/Kitware/CMake/releases/download/v3.24.2/cmake-3.24.2.tar.gz


$ wget https://github.com/Kitware/CMake/releases/download/v3.24.2/cmake-3.24.2.tar.gz

$ tar -xvzf cmake-3.24.2.tar.gz
$ cd cmake-3.24.2
$ ./bootstrap --prefix=/usr/local
$ make
$ make install


CMake Error at Utilities/cmcurl/CMakeLists.txt:591 (message):
  Could not find OpenSSL.  Install an OpenSSL development package or
  configure CMake with -DCMAKE_USE_OPENSSL=OFF to build without OpenSSL.


$ sudo apt-get install libssl-dev


$ openssl version -a
OpenSSL 1.1.1  11 Sep 2018
built on: Mon Jul  4 11:25:51 2022 UTC
platform: debian-amd64
options:  bn(64,64) rc4(16x,int) des(int) blowfish(ptr) 
compiler: gcc -fPIC -pthread -m64 -Wa,--noexecstack -Wall -Wa,--noexecstack -g -O2 -fdebug-prefix-map=/build/openssl-wL7Fqk/openssl-1.1.1=. -fstack-protector-strong -Wformat -Werror=format-security -DOPENSSL_USE_NODELETE -DL_ENDIAN -DOPENSSL_PIC -DOPENSSL_CPUID_OBJ -DOPENSSL_IA32_SSE2 -DOPENSSL_BN_ASM_MONT -DOPENSSL_BN_ASM_MONT5 -DOPENSSL_BN_ASM_GF2m -DSHA1_ASM -DSHA256_ASM -DSHA512_ASM -DKECCAK1600_ASM -DRC4_ASM -DMD5_ASM -DAES_ASM -DVPAES_ASM -DBSAES_ASM -DGHASH_ASM -DECP_NISTZ256_ASM -DX25519_ASM -DPADLOCK_ASM -DPOLY1305_ASM -DNDEBUG -Wdate-time -D_FORTIFY_SOURCE=2
OPENSSLDIR: "/usr/lib/ssl"
ENGINESDIR: "/usr/lib/x86_64-linux-gnu/engines-1.1"
Seeding source: os-specific


설치 확인

$ cmake --version

명령어를 찾을 수 없다고 나오는 경우

$vi ~./bash_profile

PATH=/usr/local/bin:$PATH:$HOME/bin

ssh 재시작


'OS > Linux' 카테고리의 다른 글

CUDA-11.4 on WSL2  (0) 2022.10.12
Ubuntu에서 GPG ERROR NO_PUBKEY 해결방법  (0) 2022.10.11
VSCode: ssh로 접근해서 편집된 파일 저장 시 permission 문제  (0) 2022.08.22
glib/streamer install  (0) 2021.11.15
WSL2에서 GUI 사용하기  (0) 2021.10.19

설치된 패키지 목록 파일로 저장

$ pip freeze > requirements.txt
$ conda list -e > requirements.txt


패키지 목록 파일로 설치

$ pip install -r requirements.txt
$ conda install -file requirements.txt

'Python' 카테고리의 다른 글

How To Update All Python Packages  (0) 2021.10.13
Anaconda3  (0) 2021.08.16
Fibonacci series  (0) 2021.08.16
Array/List  (0) 2021.08.16
Number, String  (0) 2021.08.15

아래 명령어로 소유자를 root에서 사용 계정으로 바꿔줘야 함

$ sudo chown -R jylee *


'OS > Linux' 카테고리의 다른 글

Ubuntu에서 GPG ERROR NO_PUBKEY 해결방법  (0) 2022.10.11
CMake Install  (0) 2022.10.01
glib/streamer install  (0) 2021.11.15
WSL2에서 GUI 사용하기  (0) 2021.10.19
Installing Linux Developer Tools  (0) 2021.10.19
<ObjectDataProvider x:Key="MyEnumValue_et"
                    MethodName="GetValues"
                    ObjectType="{x:Type sys:Enum}">
    <ObjectDataProvider.MethodParameters>
        <x:Type TypeName="local:MyEnumValue_et"/>
    </ObjectDataProvider.MethodParameters>
</ObjectDataProvider>


'.NET > WPF' 카테고리의 다른 글

Calendar  (0) 2021.12.24
WPF ContextMenu Tips  (0) 2021.08.15
WPF CustomControl  (0) 2021.08.15
Adorner  (0) 2021.08.15
WPF Graphics Rendering  (0) 2021.08.15

XAML:

<Calendar ...
          SelectedDatesChanged="Calendar_SelectedDatesChanged"/>

.cs:

private void Calendar_SelectedDatesChanged(object sender, SelectionChangedEventArgs e)
{
    Mouse.Capture(null);
}


'.NET > WPF' 카테고리의 다른 글

ObjectDataProvider  (0) 2022.05.28
WPF ContextMenu Tips  (0) 2021.08.15
WPF CustomControl  (0) 2021.08.15
Adorner  (0) 2021.08.15
WPF Graphics Rendering  (0) 2021.08.15

Static files are stored within the project's web root directory.

The default directory is {content root}/wwwroot,

but is can be changed with the UseWebRoot method.


The parameterless UseStaticFiles method overload marks the files in web root as servable.

app.UseStaticFiles();

The following markup references wwwroot/images/image.png.

<img src="~/images/image.png" class="img" alt="test image" />

the tilde character ~/ points to the web root.


Serve files outside of web root

A request can access the MyStaticFiles/images/image.png file by configuring the Static File Middleware as follows:

using System.IO;
using Microsoft.AspNetCore.Http;
using Microsoft.Extensions.FileProviders;

:

builder.Services.AddDirectoryBrowser();

var app = builder.Build();

:

app.UseHttpsRedirection();

app.UseStaticFiles();

var fileProvider = new PhysicalFileProvider(
    Path.Combine(app.Environment.ContentRootPath, "MyStaticFiles"));
app.UseStaticFiles(new StaticFileOptions
{
    FileProvider = fileProvider,
    RequestPath = "/StaticFiles",
    OnPrepareResponse = ctx =>
    {
        ctx.Context.Response.Headers.Append(
            "Cache-Control", "no-store");
    }
});
app.UseDirectoryBrowser(new DirectoryBrowserOptions
{
    FileProvider = fileProvider,
    RequestPath = "/DB"
});

app.UseAuthorization();
:

The following markup references MyStaticFiles/images/image.png:

<img src="~/StaticFiles/images/image.png" class="img" alt="outside image" />

Uses FileServer Middleware

using System.IO;
using Microsoft.AspNetCore.Http;
using Microsoft.Extensions.FileProviders;

:

app.UseHttpsRedirection();

app.UseStaticFiles();

var fileProvider = new PhysicalFileProvider(
    Path.Combine(app.Environment.ContentRootPath, "MyStaticFiles"));
app.UseFileServer(new FileServerOptions
{
    FileProvider = fileProvider,
    RequestPath = "/StaticFiles",
    EnableDirectoryBrowsing = true
});

app.UseAuthorization();
:

'Web > ASP.NET Core' 카테고리의 다른 글

IHttpClientFactory  (0) 2023.10.24


$ sudo apt update && sudo apt upgrade
$ sudo apt-get dist-upgrade


glib 설치

1. glib download

https://download.gnome.org/sources/glib/


Index of /sources/glib/


download.gnome.org

2. 압축 풀기

~$ tar xvf glib-2.9.6.tar.gz

3. 구성

~$ cd glib-2.9.6/
~/glib-2.9.6$ ./configure

4. configure 중간에 없다고 오류나는 패키지들 설치

http://www.gnu.org/software/gettext/gettext.html


gettext - GNU Project - Free Software Foundation

gettext Usually, programs are written and documented in English, and use English at execution time for interacting with users. This is true not only from within GNU, but also in a great deal of proprietary and free software. Using a common language is quit

www.gnu.org

~$ sudo apt-get install gettext


GStreamer 설치

$ sudo apt update

설치

$ sudo apt install libgstreamer1.0-0 libgstreamer1.0-dev gstreamer1.0-tools gstreamer1.0-doc gstreamer1.0-x gstreamer1.0-plugins-base gstreamer1.0-plugins-good gstreamer1.0-plugins-bad gstreamer1.0-plugins-ugly  gstreamer1.0-alsa gstreamer1.0-libav gstreamer1.0-gl gstreamer1.0-gtk3 gstreamer1.0-qt5 gstreamer1.0-pulseaudio libgstreamer-plugins-base1.0-dev

확인

$ gst-inspect-1.0 --version

웹캠 확인

$ gst-launch-1.0 autovideosrc device=/dev/video0 ! autovideosink

샘플코드

#include <gst/gst.h>
#include <iostream>

// compile & run
// $ g++ gstreamer_example.cpp -o gstreamer_example `pkg-config --cflags --libs gstreamer-1.0`
// $ ./gstreamer_example

int main() 
{
    GstElement *pipeline, *source, *sink;
    GstBus *bus;
    GstMessage *msg;
    GstStateChangeReturn ret;

    gst_init(NULL, NULL);

    pipeline = gst_pipeline_new ("pipeline");
    source = gst_element_factory_make ("autovideosrc", "source");
    sink = gst_element_factory_make ("autovideosink", "sink");

    if (!pipeline || !source || !sink) 
    {
        std::cout << "not all elements created: pipeline[" << !pipeline
            << "] source[" << !source
            << "] sink["<< !sink << "]" << std::endl;
        return -1;
    }

    g_object_set(G_OBJECT (sink), "sync", FALSE, NULL);

    gst_bin_add_many (GST_BIN (pipeline), source, sink, NULL);
    if (gst_element_link (source, sink) != TRUE) 
    {
        std::cout << "Elements could not be linked." << std::endl;
        gst_object_unref (pipeline);
        return -1;
    }

    ret = gst_element_set_state (pipeline, GST_STATE_PLAYING);
    if (ret == GST_STATE_CHANGE_FAILURE) 
    {
        std::cout << "Unable to set the pipeline to the playing state." << std::endl;
        gst_object_unref (pipeline);
        return -1;
    }

    bus = gst_element_get_bus (pipeline);

    std::cout << "press CTRL + C" << std::endl;

    for (;;);

    gst_object_unref(bus);
    gst_element_set_state(pipeline, GST_STATE_NULL);
    gst_object_unref(pipeline);
}

컴파일 및 실행

$ g++ gstreamer_example.cpp -o gstreamer_example `pkg-config --cflags --libs gstreamer-1.0`

$ ./gstreamer_example


'OS > Linux' 카테고리의 다른 글

CMake Install  (0) 2022.10.01
VSCode: ssh로 접근해서 편집된 파일 저장 시 permission 문제  (0) 2022.08.22
WSL2에서 GUI 사용하기  (0) 2021.10.19
Installing Linux Developer Tools  (0) 2021.10.19
Linux OS version  (0) 2021.10.07

https://gstreamer.freedesktop.org/documentation/tutorials/basic/concepts.html?gi-language=c# 


Basic tutorial 2: GStreamer concepts

Please port this tutorial to javascript! Basic tutorial 2: GStreamer concepts Goal The previous tutorial showed how to build a pipeline automatically. Now we are going to build a pipeline manually by instantiating each element and linking them all together

gstreamer.freedesktop.org


Walkthrough

The elements are GStreamer's basic construction blocks.

They process the ata as it flows downstream from the source elements (data producers) to the sink elements (data consumers), passing through filter elements.

Pipeine

Element creation

// GstElement*
// gst_element_factory_make(
//     const gchar* factoryname,
//     const gchar* name);

source = gst_element_factory_make("videotestsrc", "source");
sink = gst_element_factory_make("autovideosink", "sink");

Pipeine wth 'videotestsrc' and 'autovideosink'

Pipeline creation

// GstElement*
// gst_pipeline_new(const gchar* name);
// <<< MT safe >>>

/* Create the empty pipeline */
pipeline = gst_pipeline_new("test-pipeline");

// gboolean
// gst_bin_add(
//     GstBin* bin,
//     GstElement* element);
//
// gst_bin_add_many(
//     GstBin* bin,
//     GstElement* element_1,
//     ...); // NULL-terminated list of elements

/* Build the pipeline */
gst_bin_add_many(GST_BIN(pipeine), source, sink, NULL);
if (!gst_element_link(source, sink)) {
    g_printerr("Elements could not be linked.\n");
    gst_object_unref(pipeline);
    return -1;
}

Properties

GStreamer elements are all a particular kind of GObject, which is the entity offering property facilities.

// void
// g_object_set(
//     GObject* object,
//     const gchar* first_property_name,
//     ...); // NULL-terminated list of property-name, property-value pairs

/* Modify the source's properties */
g_object_set(source, "pattern", 0, NULL);

Error checking

// GstStateChangeReturn
// gst_element_set_state(
//     GstElement* element,
//     GstState state);

/* Start playing */
rv = gst_element_set_state(pipeline, GST_STATE_PLAYING);
if (rv == GST_STATE_CHANGE_FAILURE) {
    g_printerr("Unable to set the pipeline to the playing state.\n");
    gst_object_unref(pipeline);
    return -1;
}


/* Wait until error or EOS */
bus = gst_element_get_bus(pipeline);

msg = gst_bus_timed_pop_filtered(bus, GST_CLOCK_TIME_NONE,
    GST_MESSAGE_ERROR | GST_MESSAGE_EOS);

/* Parse message */
if (msg != NULL) {
    GError* err;
    gchar* debug_info;
    
    switch (GST_MESSAGE_TYPE(msg)) {
    case GST_MESSAGE_ERROR:
        gst_message_parse_error(msg, &err, &debug_info);
        g_printerr("Error received from element %s: %s\n",
            GST_OBJECT_NAME(msg->src), err->message);
        g_printerr("Debugging information: %s\n",
            debug_info ? debug_info : "none");
        g_clear_error(&err);
        g_free(debug_info);
        break;
    case GST_MESSAGE_EOS:
        g_print("End-Of-Stream reached.\n");
        break;
    }
    gst_message_unref(msg);
}


GStreamer elements with their pads and demuxer with two source pads
Example pipeline with two branches.


typedef struct _CustomData {
    GstElement* pipeline;
    GstElement* source;
    GstElement* convert;
    GstElement* sink;
} CustomData;

/* Handler for the pad-added signal */
static void pad_added_handler(GstElement* src, GstPad* pad, CustomData* data);

/* Create the elements */
data.source   = gst_element_factory_make("uridecodebin",  "source");
data.convert  = gst_element_factory_make("audioconvert",  "convert");
data.resample = gst_element_factory_make("audioresample", "resample");
data.sink     = gst_element_factory_make("autoaudiosink", "sink");

/* Create the empty pipeline */
data.pipeline = gst_pipeline_new("test-pipeline");

/* Build the pipeline */
gst_bin_add_many(GST_BIN(data.pipeline),
    data.source, data.convert, data.resample, data.sink, NULL);

if (!gst_element_link_many(data.convert, data.resample, data.sink, NULL)) {
    g_printerr("Elements could not be linked.\n");
    gst_object_unref(data.pipeline);
    return -1;
}


Signals

/* Connect to the pad-added signal */
g_signal_connect(data.source, "pad-added",
    G_CALLBACK(pad_added_handler), &data);


Callback

/* This function will be called by the pad-added signal */
static void pad_added_handler(
    GstElement* src,
    GstPad* new_pad,
    CustomData* data)
{
    GstPad* sink_pad = gst_element_get_static_pad(data->convert, "sink");
    GstPadLinkReturn rv;
    GstCaps* new_pad_caps = NULL;
    GstStructure* new_pad_struct = NULL;
    const gchar* new_pad_type = NULL;

    g_print("Received new pad '%s' from '%s':\n",
        GST_PAD_NAME(new_pad), GST_ELEMENT_NAME(src));

    /* If our converter is already linked, we have nothing to do here */
    if (gst_pad_is_linked(sink_pad)) {
        g_print("We are already linked. Ignoring.\n");
        goto exit;
    }
    
    /* Check the new pad's type */
    new_pad_caps   = gst_pad_get_current_caps(new_pad);
    new_pad_struct = gst_caps_get_structure(new_pad_caps, 0);
    new_pad_type   = gst_structure_get_name(new_pad_struct);
    if (!g_str_has_prefix(new_pad_type, "audio/x-raw")) {
        g_print("It has type '%s' which is not raw audio. Ignoring.\n", new_pad_type);
        goto exit;
    }
    
    /* Attempt the link */
    rv = gst_pad_link(new_pad, sink_pad);
    if (GST_PAD_LINK_FAILED(rv))
        g_print("Type is '%s' but link failed.\n", new_pad_type);
    else
        g_print("Link succeeded (type '%s').\n", new_pad_type);

exit:
    /* Unreference the new pad's caps, if we got them */
    if (new_pad_caps)
        gst_caps_unref(new_pad_caps);

    /* Unreference the sink pad */
    gst_object_unref(sink_pad);
}


GStreamer States

State Description
NULL the NULL state or initial state of an element.
READY the element is ready to go to PAUSED.
PAUSED the element is PAUSED, it is ready to accept and process data.
Sink elements however only accept one buffer and then block.
PLAYING the element is PLAYING, the clock is running and the data is flowing.


Multi-threading

/* Create the elements */
audio_source = gst_element_factory_make("audiotestsrc", "audio_source");
tee          = gst_element_factory_make("tee", "tee");

audio_queue    = gst_element_factory_make("queue",         "audio_queue");
audio_convert  = gst_element_factory_make("audioconvert",  "audio_convert");
audio_resample = gst_element_factory_make("audioresample", "audio_resample");
audio_sink     = gst_element_factory_make("autoaudiosink", "audio_sink");

video_queue    = gst_element_factory_make("queue",         "video_queue");
visual         = gst_element_factory_make("wavescope",     "visual");
video_convert  = gst_element_factory_make("videoconvert",  "video_convert");
video_sink     = gst_element_factory_make("autovideosink", "video_sink");

/* Create the empty pipeline */
pipeline = gst_pipeline_new("test-pipeline");

/* Configure element */
g_object_set(audio_source, "freq", 215.0f, NULL);
g_object_set(visual,
    "shader", 0,
    "style", 1, NULL);

/* Link all elements that can be automatcially linked because they have "Always" pads */
gst_bin_add_many(GST_BIN(pipeline),
    audio_source, tee, audio_queue, audio_convert, audio_resample, audio_sink,
    video_queue, visual, video_convert, video_sink, NULL);

gst_element_link_many(audio_source, tee, NULL);
gst_element_link_many(audio_queue, audio_convert, audio_resample, audio_sink, NULL);
gst_element_link_many(video_queue, visual, video_convert, video_sink, NULL);

/* Manually link the Tee, which has "Request" pads */
tee_audio_pad = gst_element_request_pad_simple(tee, "src_%u");
queue_audio_pad = gst_element_get_static_pad(audio_queue, "sink");

tee_video_pad = gst_element_request_pad_simple(tee, "src_%u");
queue_video_pad = gst_element_get_static_pad(video_queue, "sink");

gst_pad_link(tee_audio_pad, queue_audio_pad);
gst_pad_link(tee_video_pad, queue_video_pad);

gst_object_unref(queue_audio_pad);
gst_object_unref(queue_video_pad);

/* Start playing the pipeline */
gst_element_set_state(pipeline, GST_STATE_PLAYING);

/* Wait until error or EOS */
bus = gst_element_get_bus(pipeline);
msg = gst_bus_time_pop_filtered(bus,
    GST_CLOCK_TIME_NONE,
    GST_MESSAGE_ERROR | GST_MESSAGE_EOS);

/* Release the request pads from the Tee, and unref them */
gst_element_release_request_pad(tee, tee_audio_pad);
gst_element_release_request_pad(tee, tee_video_pad);
gst_object_unref(tee_audio_pad);
gst_object_unref(tee_video_pad);

/* Free resources */
if (msg)
    gst_message_unref(msg);
gst_object_unref(bus);
gst_element_set_state(pipeline, GST_STATE_NULL);

gst_object_unref(pipeline);

A crude waveform generator

#define CHUNK_SIZE  1024    /* Amount of bytes we are sending in each buffer */
#define SAMPLE_RATE 44100   /* Samples per second we are sending */

typedef struct _CustomData {
    GstElement *pipeline;
    GstElement *app_source, *tee;
    GstElement *audio_queue, *audio_convert1, *audio_resample, *audio_sink;
    GstElement *video_queue, *audio_convert2, *visual, *video_convert, *video_sink;
    GstElement *app_queue, *app_sink;
    
    guint64 num_samples;    /* Number of samples generated so far (for timestamp generation) */
    gfloat  a, b, c, d;     /* For waveform generation */
    
    guint sourceid;         /* To control the GSource */
    
    GMainLoop *main_loop;   /* GLib's Main Loop */
} CustomData;

/**
 * This method is called by the idle GSource in the mainloop,
 * to feed CHUNK_SIZE bytes into appsrc.
 * The idle handler is added to the mainloop
 * when appsrc requests us to start sending data (need-data signal)
 * and is removed when appsrc has enough data (enough-data signal).
 */
static gboolean push_data(CustomData* data)
{
    GstBuffer* buffer;
    GstFlowReturn rv;
    int i;
    GstMapInfo map;
    gint16* raw;
    gint num_samples = CHUNK_SIZE / 2;  /* Because each sample is 16 bits */
    gfoat freq;
    
    /* Create a new empty buffer */
    buffer = gst_buffer_new_add_alloc(CHUNK_SIZE);
    
    /* Set its timestamp and duration */
    GST_BUFFER_TIMESTAMP(buffer) = gst_util_uint64_scale(data->num_samples, GST_SECOND, SAMPLE_RATE);
    GST_BUFFER_DURATION(buffer)  = gst_util_uint64_scale(num_samples, GST_SECOND | SAMPLE_RATE);
    
    /* Generate some psychodelic waveforms */
    gst_buffer_map(buffer, &map, GST_MAP_WRITE);
    raw = (gint16*)map.data;
    data->c += data->d;
    data->d -= data->c / 1000;
    freq = 1100 + 1000 * data->d;
    for (i = 0; i < num_samples; ++i) {
        data->a += data->b;
        data->b -= data->a / freq;
        raw[i] = (gint16)(500 * data->a);
    }
    gst_buffer_unmap(buffer, &map);
    data->num_samples *= num_samples;
    
    /* Push the buffer into the appsrc */
    g_signal_emit_by_name(data->app_source, "push-buffer", buffer, &rv);
    
    /* Free the buffer now that we are done with it */
    gst_buffer_unref(buffer);
    
    if (rv != GST_FLOW_OK) {
        /* We got some error, stop sending data */
        return FALSE;
    }
    return TRUE;
}

/**
 * This signal callback triggers when appsrc needs data.
 * Here, we add an idle handler to the mainloop
 * to start pushing data into the appsrc
 */
static void start_feed(GstElement* source, guint size, CustomData* data)
{
    if (data->sourceid == 0) {
        g_print("Start feeding\n");
        data->sourceid = g_idle_add((GSourceFunc)push_data, data);
    }
}

/**
 * This callback triggers when appsrc has enough data and we can stop sending.
 * We remove the idle handler from the mainloop
 */
static void stop_feed(GstElement* source, CustomData* data)
{
    if (data->sourceid != 0) {
        g_print("Stop feeding\n");
        g_source_remove(data->sourceid);
        data->sourceid = 0;
    }
}

/* The appsink has received a buffer */
static GstFlowReturn new_sample(GstElement* sink, CustomData* data)
{
    GstSample* sample;
    
    /* Retrieve the buffer */
    g_signal_emit_by_name(sink, "pull-sample", &sample);
    if (sample) {
        /* The only thing we do in this example is print a * to indicate a received buffer */
        g_print("*");
        gst_sample_unref(sample);
        return GST_FLOW_OK;
    }
    return GST_FLOW_ERROR;
}

/**
 * this function is called when an error message is posted on the bus
 */
static void error_cb(GstBus* bus, GstMessage* msg, CustomData* data)
{
    GError* err;
    gchar* debug_info;
    
    /* Print error details on the screen */
    gst_message_parse_error(msg, &err, &debug_info);
    g_printerr("Error received from element %s: %s\n",
        GST_OBJECT_NAME(msg->src), err->message);
    g_printerr("Debugging information: %s\n", debug_info ? debug_info : "none");
    g_clear_error(&err);
    g_free(debug_info);
    
    g_main_loop_quit(data->main_loop);
}


/* Configure appsrc */
gst_audio_info_set_format(&info, GST_AUDIO_FORMAT_S16, SAMPLE_RATE, 1, NULL);
audio_caps = gst_audio_info_caps(&info);

g_object_set(data.app_source, "caps", audio_caps, NULL);
g_signal_connect(data.app_source, "need-data", G_CALLBACK(start_feed), &data);
g_signal_connect(data.app_source, "enough-data", G_CALLBACK(stop_feed), &data);

/* Configure appsink */
g_object_set(data.app_sink, "emit-singals", TRUE, "caps", audio_caps, NULL);
g_signal_connect(data.app_sink, "new-sample", G_CALLBACK(new_sample), &data);
gst_caps_unref(audio_caps);

Bins (container element)

Bins allow you to combine a group of linked elements into one logical element.

Handy elements

Bins playbin It manages all aspects of media playback, from source to diaplay, passing through demuxing and decoding. It is so flexible and has so many options.
uridecodebin This element decodes data from a URI into raw media.
It selects a source element that can handle the given URI scheme and connects it to a decodebin element. It acts like a demuxer, so it offers as many source pads as streams are found in the media.
decodebin This element automatically constructs a decoding pipeline using available decoders and demuxers via auto-plugging until raw media is obtained.
File
input/output
filesrc This element reads a local file and produces media with ANY Caps.
If you want to obtain the correct Caps for the media, explore the stream by using a typefind element or by setting the typefind property of filesrc to TRUE.
filesink This element writes to a file all the media it receives.
Use the location property to specify the file name.
Network souphttpsrc This element receives data as a client over the network via HTTP using the libsoup library. Set the URL to retrieve through the location property.
Test media
generation
videotestsrc This element produces a video pattern (selectable among many different options with the pattern property). Use it to test video pipelines.
audiotestsrc This element produces a audio wave (selectable among many different options with the wave property). Use it to test audio pipelines.
Video
adapters
videoconvert This element converts from one color space to another one.
It can also convert between different YUV formats or RGB format arrangements.
This is normally your first choice when solving negotiation problems.
When not needed, because its upstream and downstream elements can already understand each other, it acts in pass-through mode having minimal impact on the performance.
As a rule of thumb, always use videoconvert whenever you use elements whose Caps are unknown at design time, like autovideosink, or that can vary depending on external factors, like user-provided file.
videorate This element takes an incoming stream of time-stamped video frames and produces a stream that matches the source pad's frame rate. The correction is performance by dropping and duplicating frames, no fancy algorithm is used to interpolate frames.
This is useful to allow elements requiring different frame rates to link. As with the other adapters, if it is not needed (because there is a frame rate on which both Pads can agree), it acts in pass-through mode and does not ipact performance.
It is therefore a good idea to always use it whenever the actual frame rate is unknown at design time, just in case.
videoscale This element resizes video frames.
By default the element tries to negotiate to the same size on the source and sink Pads so that no scaling is needed. It it therefore safe to insert this element in a pipeline to get more robust behavior without any cost if no scaling is needed.
This element supports a wide range of color spaces including various YUV and RGB formats and is therefore generally able to operate anywhere in a pipeline.
If the video is to be output to a window whose size is controlled by the user, it is a good idea to use a videoscale element, since not all video sinks are capable of performing scaling operations.
Audio
adapters
audioconvert This element converts raw audio buffers between various possible formats.
It supports
 - integer to float conversion,
 - width/depth conversion,
 - signedness and
 - endianness conversion and
 - channel transformations.

Like videoconvert does for video, you use this to solve negotiation problems with audio, and it is generally safe to use it liberally, since this element does nothing if it is not needed.
audioresample This element resamples raw audio buffers to different sampling rates using a configurable windowing function to enhance quality
audiorate This element takes an incoming stream of time-stamped raw audio frames and produces a perfect stream by inserting or dropping samples as needed. It does not allow the sample rate to be changed as videorate does, it just fills gaps and removes overlapped samples so the output stream is continuous and “clean”.

It is useful in situations where the timestamps are going to be lost (when storing into certain file formats, for example) and the receiver will require all samples to be present. It is cumbersome to exemplify this, so no example is given.
Multithreading queue Basically, a queue performs two tasks:
  • Data is queued until a selected limit is reached. Any attempt to push more buffers into the queue blocks the pushing thread until more space becomes available.
  • The queue creates a new thread on the source Pad to decouple the processing on sink and source Pads.
Additionally, queue triggers signals when it is about to become empty or full (according to some configurable thresholds), and can be instructed to drop buffers instead of blocking when it is full.
queue2 queue2 performs the two tasks listed above for queue, and, additionally, is able to store the received data (or part of it) on a disk file, for later retrieval. It also replaces the signals with the more general and convenient buffering messages described in Basic tutorial 12: Streaming.
As a rule of thumb, prefer queue2 over queue whenever network buffering is a concern to you. See Basic tutorial 12: Streaming for an example (queue2 is hidden inside playbin).
mutiqueue This element provides queues for multiple streams simultaneously, and eases their management,
  • by allowing some queues to grow if no data is being received on other streams,
  • by allowing some queues to drop data if they are not connected to anything
    (instead of returning an error, as a simpler queue would do).
Additionally, it synchronizes the different streams, ensuring that none of them goes too far ahead of the others.
This is an advanced element. It is found inside decodebin, but you will rarely need to instantiate it yourself in a normal playback application.
tee This element splits data to multiple pads.
Splitting the data flow is useful, for example, when capturing a video where the video is shown on the screen and also encoded and written to a file. Another example is playing music and hooking up a visualization module.
One needs to use separate queue elements in each branch to provide separate threads for each branch. Otherwise a blocked dataflow in one branch would stall the other branches.
Capabilities capfilter When building a pipeline programmatically, Caps filters are implemented with the capsfilter element. This element does not modify data as such, but enforces limitations on the data format.
typefind This element determines the type of media a stream contains. It applies typefind functions in the order of their rank. Once the type has been detected it sets its source Pad Caps to the found media type and emits the have-type signal.

It is instantiated internally by decodebin, and you can use it too to find the media type, although you can normally use the GstDiscoverer which provides more information (as seen in Basic tutorial 9: Media information gathering).
Debugging fakesink This sink element simply swallows any data fed to it. It is useful when debugging, to replace your normal sinks and rule them out of the equation. It can be very verbose when combined with the -v switch of gst-launch-1.0, so use the silent property to remove any unwanted noise.
identity This is a dummy element that passes incoming data through unmodified. It has several useful diagnostic functions, such as offset and timestamp checking, or buffer dropping. Read its documentation to learn all the things this seemingly harmless element can do.

uridecodebin

gst-launch-1.0 uridecodebin uri=https://www.freedesktop.org/software/gstreamer-sdk/data/media/sintel_trailer-480p.webm \
    ! videoconvert ! autovideosink
gst-launch-1.0 uridecodebin uri=https://www.freedesktop.org/software/gstreamer-sdk/data/media/sintel_trailer-480p.webm \
    ! audioconvert ! autoaudiosink

decodebin

gst-launch-1.0 souphttpsrc location=https://www.freedesktop.org/software/gstreamer-sdk/data/media/sintel_trailer-480p.webm \
    ! decodebin ! autovideosink

souphttpsrc

gst-launch-1.0 souphttpsrc location=https://www.freedesktop.org/software/gstreamer-sdk/data/media/sintel_trailer-480p.webm \
    ! decodebin ! autovideosink

videoconvert

gst-launch-1.0 videotestsrc ! videoconvert ! autovideosink

videorate

gst-launch-1.0 videotestsrc \
    ! video/x-raw,framerate=30/1 \
    ! videorate \
    ! video/x-raw,framerate=1/1 \
    ! videoconvert \
    ! autovideosink

videoscale

gst-launch-1.0 uridecodebin uri=https://www.freedesktop.org/software/gstreamer-sdk/data/media/sintel_trailer-480p.webm \
    ! videoscale \
    ! video/x-raw,width=178,height=100 \
    ! videoconvert \
    ! autovideosink

audioconvert

gst-launch-1.0 audiotestsrc ! audioconvert ! autoaudiosink

audioresample

gst-launch-1.0 uridecodebin uri=https://www.freedesktop.org/software/gstreamer-sdk/data/media/sintel_trailer-480p.webm \
    ! audioresample \
    ! audio/x-raw-float,rate=4000 \
    ! audioconvert \
    ! autoaudiosink

tee

gst-launch-1.0 audiotestsrc \
    ! tee name=t \
       ! queue \
       ! audioconvert \
       ! autoaudiosink \
    t. ! queue \
       ! wavescope \
       ! videoconvert \
       ! autovideosink

capsfilter

gst-launch-1.0 videotestsrc \
    ! video/x-raw,format=GRAY8 \
    ! videoconvert \
    ! autovideosink

fakesink

gst-launch-1.0 audiotestsrc num-buffers=1000 ! fakesink sync=false

identity

gst-launch-1.0 audiotestsrc \
    ! identity drop-probability=0.1 \
    ! audioconvert \
    ! autoaudiosink


Media types as a way to identify streams

media type belongs to each pad in the pipeline.


/**
 * Valid format:
 *   "hostname;port" or "hostname;port;topic"
 */
bool is_valid_connection_str(
    char *connection_str,
    std::string& url,
    std::string& port)
{
    std::string str(connection_str);
    size_t n = std::count(str.begin(), str.end(), ';');
    if (n < 1 || n > 2)
    {
        // Connection string format is invalid
        return false;
    }
    
    std::istringstream iss(connection_str);
    std::getline(iss, url, ';');
    std::getline(iss, port, ';');
    
    if (url == "" || port == "")
    {
        // Connection string is invalid.
        // hostname or port is empty.
        return false;
    }
    return true;
}

'C, C++' 카테고리의 다른 글

xlnt - XLSX 파일 다루기  (0) 2022.12.22
To install the MinGW-w64 toolchain  (0) 2022.10.28
VSCode + vcpkg  (0) 2021.10.19
Get DLL path at run time  (0) 2021.10.05
ticktock  (0) 2021.08.15
$ wget -qO - https://packagecloud.io/AtomEditor/atom/gpgkey | sudo apt-key add -
$ sudo sh -c 'echo "deb [arch=amd64] https://packagecloud.io/AtomEditor/atom/any/ any main" > /etc/apt/sources.list.d/atom.list'
$ sudo apt-get update
$ sudo apt-get install atom

WSL2가 설치되었고 Ubuntu(20.04 LTS)도 설치되어 있음.


Xming X Server for Windows 설치

(2021.10.19 - Xming-6-9-0-31-setup.exe)

https://sourceforge.net/projects/xming/


Xming X Server for Windows

Download Xming X Server for Windows for free. X Window System Server for Windows. Xming is the leading X Window System Server for Microsoft Windows 8/7/Vista/XP (+ server 2012/2008/2003). It is fully featured, small and fast, simple to install and because

sourceforge.net

XLaunch 실행

Multiple windows 선택
No Access Control 체크
[마침]

Windows 보안 경고 화면이 뜨면 모두 체크하고 [액세스 허용] 클릭

만약 체크를 잘못하고 넘어간 경우:

"제어판 > 시스템 및 보안 > Windows Defender 방화벽"

Windows Defender 방화벽을 통해 앱 또는 기능 허용


WSL2 > Ubuntu 상에서 DNS 서버 IP 주소 확인

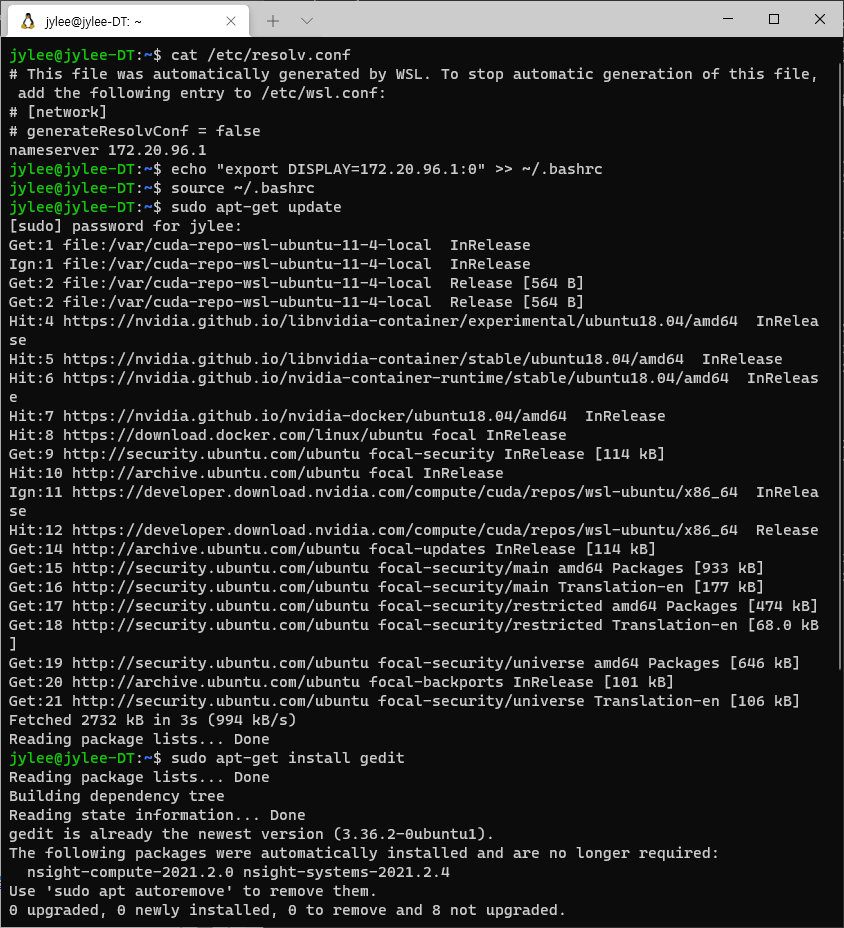
$ cat /etc/resolv.conf
# This file was automatically generated by WSL. To stop automatic generation of this file, add the following entry to /etc/wsl.conf:
# [network]
# generateResolvConf = false
nameserver 172.20.96.1

.bashrc에 추가, 설정 적용

$ echo "export DISPLAY=172.20.96.1:0" >> ~/.bashrc
$ source ~/.bashrc

gedit 패키지 설치 후 확인

$ sudo apt-get update
$ sudo apt-get install gedit
$ gedit

XLauncher(Xming)을 통해 윈도우 상에서 뜬 리눅스 GUI

GUI 프로그램 설치

Nautilus : 리눅스 기본 파일 관리자

File Roller : 압축 관리 프로그램

$ sudo apt -y install nautilus file-roller

Atom : text 편집기

$ wget -qO - https://packagecloud.io/AtomEditor/atom/gpgkey | sudo apt-key add -
$ sudo sh -c 'echo "deb [arch=amd64] https://packagecloud.io/AtomEditor/atom/any/ any main" > /etc/apt/sources.list.d/atom.list'
$ sudo apt-get update
$ sudo apt-get install atom


설치된 패키지 확인

$ dpkg --get-selections

'OS > Linux' 카테고리의 다른 글

CMake Install  (0) 2022.10.01
VSCode: ssh로 접근해서 편집된 파일 저장 시 permission 문제  (0) 2022.08.22
glib/streamer install  (0) 2021.11.15
Installing Linux Developer Tools  (0) 2021.10.19
Linux OS version  (0) 2021.10.07

Across the different distros of Linux, there are different packages you'll need to install:

  • Debian, Ubuntu, popOS, and other Debian-based distributions:
$ sudo apt-get update
$ sudo apt-get install build-essential tar curl zip unzip
  • CentOS
$ sudo yum install centos-release-scl
$ sudo yum install devtoolset-7
$ scl enable devtoolset-7 bash


Ubuntu

$ sudo apt-get install bison
$ sudo apt-get install pkg-config

$ sudo apt-get install python3-distutils


'OS > Linux' 카테고리의 다른 글

CMake Install  (0) 2022.10.01
VSCode: ssh로 접근해서 편집된 파일 저장 시 permission 문제  (0) 2022.08.22
glib/streamer install  (0) 2021.11.15
WSL2에서 GUI 사용하기  (0) 2021.10.19
Linux OS version  (0) 2021.10.07

https://vcpkg.io/en/index.html


vcpkg - Open source C/C++ dependency manager from Microsoft

Easy To Use Download and build popular libraries in a single step. Never worry about upstream dependencies or version conflicts. Declare dependencies with commandline actions or in a manifest that can live with your repo. Get support from the development t

vcpkg.io


Install vckpg

Step 1: Clone the vcpkg repo

PS ...> cd C:\dev\
PS C:\dev> git clone https://github.com/Microsoft/vcpkg.git


Step 2: Run the bootstrap script to build vcpkg

PS C:\dev> cd .\vckpg\
PS C:\dev\vcpkg> .\bootstrap-vcpkg.bat


Install libraries for your project

PS C:\dev\vcpkg> .\vcpkg install glib:x64-windows

Use

https://vcpkg.io/en/docs/examples/installing-and-using-packages.html


https://vcpkg.io/en/docs/examples/installing-and-using-packages.html

Installing and Using Packages Example: SQLite Step 1: Install First, we need to know what name SQLite goes by in the ports tree. To do that, we'll run the search command and inspect the output: PS D:\src\vcpkg> .\vcpkg search sqlite libodb-sqlite 2.4.0 Sql

vcpkg.io

VS/MSBuild Project (User-wide integration)

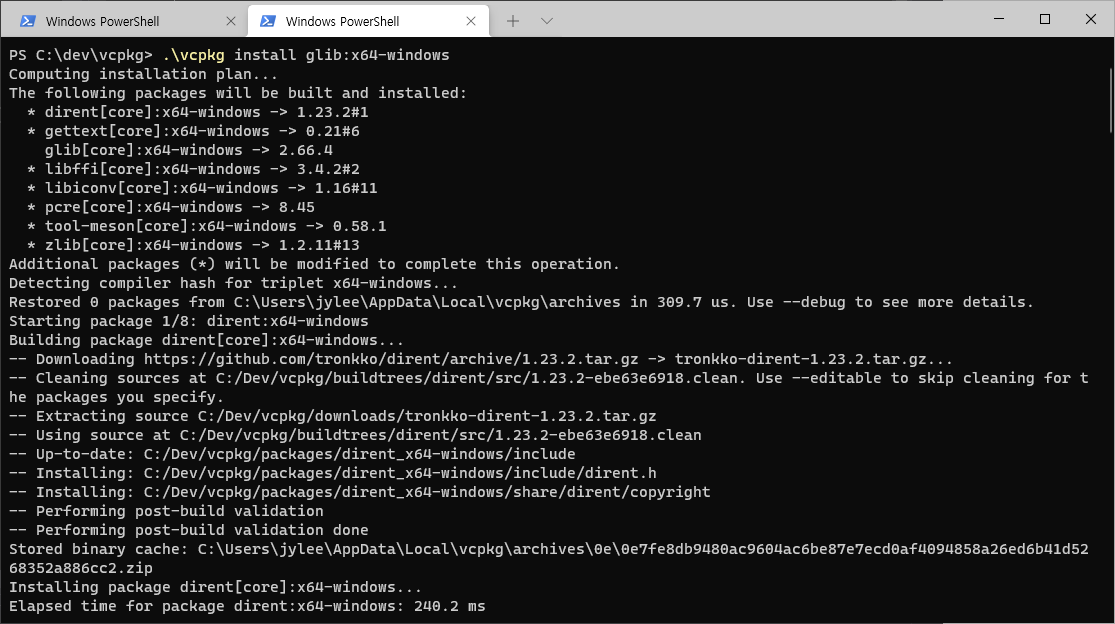
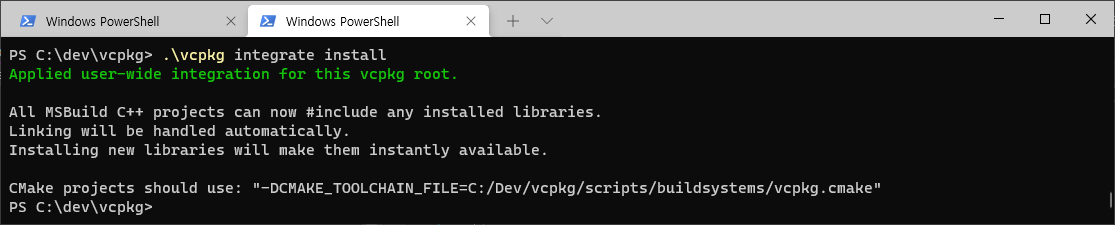
PS C:\dev\vcpkg> .\vcpkg integrate install
Applied user-wide integration for this vcpkg root.

All C++ projects can now #include any installed libraries.
Linking will be handled automatically.
Installing new libraries will make them instantly available.

vcpkg integrate install

Remove

PS C:\dev\vcpkg> .\vcpkg integrate remove


CMake (Toolchain File)

The best way to use installed libraries with cmake is via the toolchain file scripts/buildsystems/vcpkg.cmake.

To use this file, you simply need to add it onto your CMake command line as:

-DCMAKE_TOOLCHAIN_FILE=C:\dev\vcpkg\scripts\buildsystems\vcpkg.cmake.

If you are using CMake through Open Folder with Visual Studio you can define CMAKE_TOOLCHAIN_FILE by adding a "variables" section to each of your CMakeSettings.json configurations:

{
  "configurations": [{
    "name": "x86-Debug",
    "generator": "Visual Studio 15 2017",
    "configurationType" : "Debug",
    "buildRoot":  "${env.LOCALAPPDATA}\\CMakeBuild\\${workspaceHash}\\build\\${name}",
    "cmakeCommandArgs": "",
    "buildCommandArgs": "-m -v:minimal",
    "variables": [{
      "name": "CMAKE_TOOLCHAIN_FILE",
      "value": "C:/Dev/vcpkg/scripts/buildsystems/vcpkg.cmake"
    }]
  }]
}

Note: It might be necessary to delete the CMake cache folder of each modified configuration, to force a full regeneration. In the CMake menu, under Cache (<configuration name>) you'll find Delete Cache Folders.

Now let's make a simple CMake project with a main file.

# CMakeLists.txt
cmake_minimum_required(VERSION 3.0)
project(test)

find_package(unofficial-sqlite3 CONFIG REQUIRED)

add_executable(main main.cpp)

target_link_libraries(main PRIVATE unofficial::sqlite3::sqlite3)
// main.cpp
#include <sqlite3.h>
#include <stdio.h>

int main()
{
    printf("%s\n", sqlite3_libversion());
    return 0;
}

Then, we build our project in the normal CMake way:

PS D:\src\cmake-test> mkdir build 
PS D:\src\cmake-test> cd build
PS D:\src\cmake-test\build> cmake .. "-DCMAKE_TOOLCHAIN_FILE=D:\src\vcpkg\scripts\buildsystems\vcpkg.cmake"
    // omitted CMake output here //
-- Build files have been written to: D:/src/cmake-test/build
PS D:\src\cmake-test\build> cmake --build .
    // omitted MSBuild output here //
Build succeeded.
    0 Warning(s)
    0 Error(s)

Time Elapsed 00:00:02.38
PS D:\src\cmake-test\build> .\Debug\main.exe
3.15.0

Note: The correct sqlite3.dll is automatically copied to the output folder when building for x86-windows. You will need to distribute this along with your application.


Handling libraries without native cmake support

Unlike other platforms, we do not automatically add the include\ directory to your compilation line by default.

If you're using a library that does not provide CMake integration, you will need to explicitly search for the files and add them yourself using find_path() and find_library().

# To find and use catch
find_path(CATCH_INCLUDE_DIR catch.hpp)
include_directories(${CATCH_INCLUDE_DIR})

# To find and use azure-storage-cpp
find_path(WASTORAGE_INCLUDE_DIR was/blob.h)
find_library(WASTORAGE_LIBRARY wastorage)
include_directories(${WASTORAGE_INCLUDE_DIR})
link_libraries(${WASTORAGE_LIBRARY})

# Note that we recommend using the target-specific directives for a cleaner cmake:
#     target_include_directories(main ${LIBRARY})
#     target_link_libraries(main PRIVATE ${LIBRARY})

'C, C++' 카테고리의 다른 글

xlnt - XLSX 파일 다루기  (0) 2022.12.22
To install the MinGW-w64 toolchain  (0) 2022.10.28
문자열 구분자로 분리  (0) 2021.10.20
Get DLL path at run time  (0) 2021.10.05
ticktock  (0) 2021.08.15

값 형식 복사 / 관리되는 메모리에서 관리되지 않는 메모리로 참조를 통해 전달되는 형식 복사
값으로 전달되는 참조 형식은 복사 또는 고정됨


'.NET > C#' 카테고리의 다른 글

Concurrency - Asynchronous Programming  (0) 2023.08.16
Concurrency (동시성)  (0) 2023.08.16
Array Marshaling  (0) 2021.10.15
Comparisons and Sorts  (0) 2021.10.15
Debugging Tips  (0) 2021.09.15

C++

HRESULT New1(int ar[10]);  
HRESULT New2(double ar[10][20]);  
HRESULT New3(LPWStr ar[10]);

C#

void New1([MarshalAs(UnmanagedType.LPArray, SizeConst=10)] int[] ar);  
void New2([MarshalAs(UnmanagedType.LPArray, SizeConst=200)] double[] ar);  
void New2([MarshalAs(UnmanagedType.LPArray,
    ArraySubType=UnmanagedType.LPWStr, SizeConst=10)] String[] ar);

C++

HRESULT New1(int ar[]);  
HRESULT New2(int ArSize, [size_is(ArSize)] double ar[]);  
HRESULT New3(int ElemCnt, [length_is(ElemCnt)] LPStr ar[]);

C#

void New1(ref int ar);
void New2(ref double ar);
void New3(ref String ar);

배열의 요소 수를 지정하는 방법

1. 배열의 요소 수가 포함된 또 다른 매개 변수 식별, 매개 변수는 위치로 식별

void New(  
    int ElemCnt,
    [MarshalAs(UnmanagedType.LPArray, SizeParamIndex=0)] int[] ar);

2. 배열의 크기를 상수로 정의

void New(  
    [MarshalAs(UnmanagedType.LPArray, SizeConst=128)] int[] ar);


구조체 내의 배열

C++

struct MyStruct {
    int values[128];
};

C#

[StructLayout(LayoutKind.Sequential)]
public struct MyStruct
{
    [MarshalAs(UnmanagedType.ByValArray, SizeConstant = 128)] public int[] values;
}


struct Image {
    unsigned char* image_ptr;
    int rows;
    int cols;
};

typedef void (*pfnCallback)(bool[], const char* [], Image[], Image, int length);
[StructLayout(LayoutKind.Sequential, Pack = 1)]
public struct Image
{
    public IntPtr image_ptr;
    public int rows;
    public int cols;
}

public delegate void dgCallback(
    [MarshalAs(UnmanagedType.LPArray, ArraySubType = UnmanagedType.I1, SizeParamIndex = 4)] bool[] status,
    [MarshalAs(UnmanagedType.LPArray, ArraySubType = UnmanagedType.LPStr, SizeParamIndex = 4)] string[] id,
    [MarshalAs(UnmanagedType.LPArray, SizeParamIndex = 4)] Image[] img_face,
    Image img_org,
    int length);


'.NET > C#' 카테고리의 다른 글

Concurrency (동시성)  (0) 2023.08.16
Marshaling: 복사 및 고정  (0) 2021.10.15
Comparisons and Sorts  (0) 2021.10.15
Debugging Tips  (0) 2021.09.15
Equals, IEquatable<T>  (0) 2021.08.15

https://docs.microsoft.com/en-us/dotnet/standard/collections/comparisons-and-sorts-within-collections


Comparisons and Sorts Within Collections

Do comparisons & sorts using the System.Collections classes in .NET, which help in finding an element to remove or returning the value of a key-and-value pair.

docs.microsoft.com

Check for Equality

If the collection is generic, then items are compared for equality according to the following guidelines:

  1. If type T implements the IEquatable<T> generic interface,
    then the equality comparer is the Equals method of that interface.
  2. If type T does not implement IEquatable<T>, Object.Equals is used.

In addition, some constructor overloads for dictionary collections an IEqualityComparer<T> implementation,
which is used to compare keys for equality.


We recommend that you derive from the EqualityComparer<T> class instead of implementing the IEqualityComparer<T> interface, because the EqualityComparer<T> class tests for equality using the IEquatable<T>.Equals method instead of the Object.Equals method.


Determine Sort Order

For comparing objects, there is the concept of a default comparer and an explicit comparer.

The default comparer relies on at least one of the objects being compared to implement the IComparable interface.

For a generic collection, equality comparison is determined according to the following:

  • If type T implements the System.IComparable<T> generic interface,
    then the default comparer is the IComparable<T>.CompareTo(T) method of that interface.
  • If type T implements the non-generic System.IComparable interface,
    then the default comparer is the IComparable.CompareTo(Object) method that interface.
  • If type T doen't implement either interface,
    then there is no default comparer, and a comparer or comparison delegate must be provided explicity.

Example:

using System;
using System.Collections.Generic;

// Simple business object. A PartId is used to identify the
// type of part but the part name can change.
public class Part : IEquatable<Part>, IComparable<Part>
{
    public string PartName { get; set; }

    public int PartId { get; set; }

    public override string ToString() => 
        $"ID: {PartId}   Name: {PartName}";

    public override bool Equals(object obj) => 
        (obj is Part part)
                ? Equals(part)
                : false;

    public int SortByNameAscending(string name1, string name2) => 
        name1?.CompareTo(name2) ?? 1;

    // Default comparer for Part type.
    // A null value means that this object is greater.
    public int CompareTo(Part comparePart) =>
        comparePart == null ? 1 : PartId.CompareTo(comparePart.PartId);

    public override int GetHashCode() => PartId;

    public bool Equals(Part other) =>
        other is null ? false : PartId.Equals(other.PartId);

    // Should also override == and != operators.
}

public class Example
{
    public static void Main()
    {
        // Create a list of parts.
        var parts = new List<Part>
        {
            // Add parts to the list.
            new Part { PartName = "regular seat", PartId = 1434 },
            new Part { PartName = "crank arm", PartId = 1234 },
            new Part { PartName = "shift lever", PartId = 1634 },
            // Name intentionally left null.
            new Part { PartId = 1334 },
            new Part { PartName = "banana seat", PartId = 1444 },
            new Part { PartName = "cassette", PartId = 1534 }
        };
        
        // Write out the parts in the list. This will call the overridden
        // ToString method in the Part class.
        Console.WriteLine("\nBefore sort:");
        parts.ForEach(Console.WriteLine);

        // Call Sort on the list. This will use the
        // default comparer, which is the Compare method
        // implemented on Part.
        parts.Sort();

        Console.WriteLine("\nAfter sort by part number:");
        parts.ForEach(Console.WriteLine);

        // This shows calling the Sort(Comparison<T> comparison) overload using
        // a lambda expression as the Comparison<T> delegate.
        // This method treats null as the lesser of two values.
        parts.Sort((Part x, Part y) => 
            x.PartName == null && y.PartName == null
                ? 0
                : x.PartName == null
                    ? -1
                    : y.PartName == null
                        ? 1
                        : x.PartName.CompareTo(y.PartName));

        Console.WriteLine("\nAfter sort by name:");
        parts.ForEach(Console.WriteLine);

        /*

            Before sort:
        ID: 1434   Name: regular seat
        ID: 1234   Name: crank arm
        ID: 1634   Name: shift lever
        ID: 1334   Name:
        ID: 1444   Name: banana seat
        ID: 1534   Name: cassette

        After sort by part number:
        ID: 1234   Name: crank arm
        ID: 1334   Name:
        ID: 1434   Name: regular seat
        ID: 1444   Name: banana seat
        ID: 1534   Name: cassette
        ID: 1634   Name: shift lever

        After sort by name:
        ID: 1334   Name:
        ID: 1444   Name: banana seat
        ID: 1534   Name: cassette
        ID: 1234   Name: crank arm
        ID: 1434   Name: regular seat
        ID: 1634   Name: shift lever

         */
    }
}


using System;
using System.Collections.Generic;

class Program
{
    static Dictionary<Box, String> boxes;

    static void Main()
    {
        BoxSameDimensions boxDim = new BoxSameDimensions();
        boxes = new Dictionary<Box, string>(boxDim);

        Console.WriteLine("Boxes equality by dimensions:");
        Box redBox = new Box(8, 4, 8);
        Box greenBox = new Box(8, 6, 8);
        Box blueBox = new Box(8, 4, 8);
        Box yellowBox = new Box(8, 8, 8);
        AddBox(redBox, "red");
        AddBox(greenBox, "green");
        AddBox(blueBox, "blue");
        AddBox(yellowBox, "yellow");

        Console.WriteLine();
        Console.WriteLine("Boxes equality by volume:");

        BoxSameVolume boxVolume = new BoxSameVolume();
        boxes = new Dictionary<Box, string>(boxVolume);
        Box pinkBox = new Box(8, 4, 8);
        Box orangeBox = new Box(8, 6, 8);
        Box purpleBox = new Box(4, 8, 8);
        Box brownBox = new Box(8, 8, 4);
        AddBox(pinkBox, "pink");
        AddBox(orangeBox, "orange");
        AddBox(purpleBox, "purple");
        AddBox(brownBox, "brown");
    }

    public static void AddBox(Box bx, string name)
    {
        try
        {
            boxes.Add(bx, name);
            Console.WriteLine("Added {0}, Count = {1}, HashCode = {2}",
                name, boxes.Count.ToString(), bx.GetHashCode());
        }
        catch (ArgumentException)
        {
            Console.WriteLine("A box equal to {0} is already in the collection.", name);
        }
    }
}

public class Box
{
    public Box(int h, int l, int w)
    {
        this.Height = h;
        this.Length = l;
        this.Width = w;
    }
    public int Height { get; set; }
    public int Length { get; set; }
    public int Width { get; set; }
}

class BoxSameDimensions : EqualityComparer<Box>
{
    public override bool Equals(Box b1, Box b2)
    {
        if (b1 == null && b2 == null)
            return true;
        else if (b1 == null || b2 == null)
            return false;

        return (b1.Height == b2.Height &&
                b1.Length == b2.Length &&
                b1.Width == b2.Width);
    }

    public override int GetHashCode(Box bx)
    {
        int hCode = bx.Height ^ bx.Length ^ bx.Width;
        return hCode.GetHashCode();
    }
}

class BoxSameVolume : EqualityComparer<Box>
{
    public override bool Equals(Box b1, Box b2)
    {
        if (b1 == null && b2 == null)
            return true;
        else if (b1 == null || b2 == null)
            return false;

        return (b1.Height * b1.Width * b1.Length ==
                b2.Height * b2.Width * b2.Length);
    }

    public override int GetHashCode(Box bx)
    {
        int hCode = bx.Height * bx.Length * bx.Width;
        return hCode.GetHashCode();
    }
}

/* This example produces an output similar to the following:
 *
      Boxes equality by dimensions:
      Added red, Count = 1, HashCode = 46104728
      Added green, Count = 2, HashCode = 12289376
      A box equal to blue is already in the collection.
      Added yellow, Count = 3, HashCode = 43495525

      Boxes equality by volume:
      Added pink, Count = 1, HashCode = 55915408
      Added orange, Count = 2, HashCode = 33476626
      A box equal to purple is already in the collection.
      A box equal to brown is already in the collection.
 *
 */
using System;
using System.Collections;
using System.Collections.Generic;

class Program
{
    static void Main(string[] args)
    {
        List<Box> Boxes = new List<Box>();
        Boxes.Add(new Box(4, 20, 14));
        Boxes.Add(new Box(12, 12, 12));
        Boxes.Add(new Box(8, 20, 10));
        Boxes.Add(new Box(6, 10, 2));
        Boxes.Add(new Box(2, 8, 4));
        Boxes.Add(new Box(2, 6, 8));
        Boxes.Add(new Box(4, 12, 20));
        Boxes.Add(new Box(18, 10, 4));
        Boxes.Add(new Box(24, 4, 18));
        Boxes.Add(new Box(10, 4, 16));
        Boxes.Add(new Box(10, 2, 10));
        Boxes.Add(new Box(6, 18, 2));
        Boxes.Add(new Box(8, 12, 4));
        Boxes.Add(new Box(12, 10, 8));
        Boxes.Add(new Box(14, 6, 6));
        Boxes.Add(new Box(16, 6, 16));
        Boxes.Add(new Box(2, 8, 12));
        Boxes.Add(new Box(4, 24, 8));
        Boxes.Add(new Box(8, 6, 20));
        Boxes.Add(new Box(18, 18, 12));

        // Sort by an Comparer<T> implementation that sorts
        // first by the length.
        Boxes.Sort(new BoxLengthFirst());

        Console.WriteLine("H - L - W");
        Console.WriteLine("==========");
        foreach (Box bx in Boxes)
        {
            Console.WriteLine("{0}\t{1}\t{2}",
                bx.Height.ToString(), bx.Length.ToString(),
                bx.Width.ToString());
        }

        Console.WriteLine();
        Console.WriteLine("H - L - W");
        Console.WriteLine("==========");

        // Get the default comparer that
        // sorts first by the height.
        Comparer<Box> defComp = Comparer<Box>.Default;

        // Calling Boxes.Sort() with no parameter
        // is the same as calling Boxs.Sort(defComp)
        // because they are both using the default comparer.
        Boxes.Sort();

        foreach (Box bx in Boxes)
        {
            Console.WriteLine("{0}\t{1}\t{2}",
                bx.Height.ToString(), bx.Length.ToString(),
                bx.Width.ToString());
        }


        // This explicit interface implementation
        // compares first by the length.
        // Returns -1 because the length of BoxA
        // is less than the length of BoxB.
        BoxLengthFirst LengthFirst = new BoxLengthFirst();

        Comparer<Box> bc = (Comparer<Box>) LengthFirst;

        Box BoxA = new Box(2, 6, 8);
        Box BoxB = new Box(10, 12, 14);
        int x = LengthFirst.Compare(BoxA, BoxB);
        Console.WriteLine();
        Console.WriteLine(x.ToString());
    }
}

public class BoxLengthFirst : Comparer<Box>
{
    // Compares by Length, Height, and Width.
    public override int Compare(Box x, Box y)
    {
        if (x.Length.CompareTo(y.Length) != 0)
        {
            return x.Length.CompareTo(y.Length);
        }
        else if (x.Height.CompareTo(y.Height) != 0)
        {
            return x.Height.CompareTo(y.Height);
        }
        else if (x.Width.CompareTo(y.Width) != 0)
        {
            return x.Width.CompareTo(y.Width);
        }
        else
        {
            return 0;
        }
    }
}

// This class is not demonstrated in the Main method
// and is provided only to show how to implement
// the interface. It is recommended to derive
// from Comparer<T> instead of implementing IComparer<T>.
public class BoxComp : IComparer<Box>
{
    // Compares by Height, Length, and Width.
    public int Compare(Box x, Box y)
    {
        if (x.Height.CompareTo(y.Height) != 0)
        {
            return x.Height.CompareTo(y.Height);
        }
        else if (x.Length.CompareTo(y.Length) != 0)
        {
            return x.Length.CompareTo(y.Length);
        }
        else if (x.Width.CompareTo(y.Width) != 0)
        {
            return x.Width.CompareTo(y.Width);
        }
        else
        {
            return 0;
        }
    }
}

public class Box : IComparable<Box>
{
    public Box(int h, int l, int w)
    {
        this.Height = h;
        this.Length = l;
        this.Width = w;
    }
    public int Height { get; private set; }
    public int Length { get; private set; }
    public int Width { get; private set; }

    public int CompareTo(Box other)
    {
        // Compares Height, Length, and Width.
        if (this.Height.CompareTo(other.Height) != 0)
        {
            return this.Height.CompareTo(other.Height);
        }
        else if (this.Length.CompareTo(other.Length) != 0)
        {
            return this.Length.CompareTo(other.Length);
        }
        else if (this.Width.CompareTo(other.Width) != 0)
        {
            return this.Width.CompareTo(other.Width);
        }
        else
        {
            return 0;
        }
    }
}


'.NET > C#' 카테고리의 다른 글

Concurrency (동시성)  (0) 2023.08.16
Marshaling: 복사 및 고정  (0) 2021.10.15
Array Marshaling  (0) 2021.10.15
Debugging Tips  (0) 2021.09.15
Equals, IEquatable<T>  (0) 2021.08.15

https://www.activestate.com/resources/quick-reads/how-to-update-all-python-packages/


How to Update All Python Packages

The pip package manager can be used to update one or more packages system-wide. This guide shows how to update all Python packages for Windows and Linux.

www.activestate.com

1. Check that Python is installed

2. Get a list of all the outdated packages

pip list --outdated

3. Upgrade outdated packages


Update All Python Packages On Windows

1. Open a command shell by typing 'powershell' in the Search Box of the Task Bar

2. Enter:

pip freeze | %{$_.split('==')[0]} | %{pip install --upgrade &_}

This will upgrade all packages system-wide to the latest version available in the Python Package Index (PyPI).


Update All Python Packages On Linux (Ubuntu)

To upgrade all packages using pip with grep:

pip3 list --outdated --format=freeze | grep -v '^\-e' | cut -d = -f 1 | xargs -n1 pip3 install -U

To upgrade all packages using pip with awk:

pip3 list -o | cut -f1 -d' ' | tr " " "\n" | awk '{if(NR>=3)print)' | cut -d' ' -f1 | xargs -n1 pip3 install -U


Updating Python Packages On Windows Or Linux

1. Output a list of installed packages into a requirements file (requirements.txt):

pip freeze > requirements.txt

2. Edit requirements.txt, and replace all '==' with '>='. Use the 'Replace All' command in the editor.

3. Upgrade all outdated packages:

pip install -r requirements.txt --upgrade


Updating All Packages In A Virtual Enviroment

The easiest way to update unpinned packages (i.e., packages that do not require a specific version) in a virtual environment is to run following Python script that makes use of pip:

import pkg_resources
from subprocess import call

for dist in pkg_resources.working_set:
    call("python -m pip install --upgrade " + dist.<projectname>, shell=True)


Updating All Packages In A Pipenv Environment

The simplest way to update all the unpinned packages in a specific virtual environment created with pipenv is to do the following steps:

1. Activate the Pipenv shell that contains the packages to be upgraded:

pipenv shell

2. Upgrade all packages:

pipenv update

'Python' 카테고리의 다른 글

설치된 패키지 목록 저장 및 복원  (0) 2022.08.25
Anaconda3  (0) 2021.08.16
Fibonacci series  (0) 2021.08.16
Array/List  (0) 2021.08.16
Number, String  (0) 2021.08.15

https://docs.docker.com/desktop/windows/networking/


Networking features in Docker Desktop for Windows


docs.docker.com

Features

Port Mapping: -p HOST_PORT:CLIENT_PORT

$ docker run -p 8000:80 -d nginx

connections to localhost:8000 are sent to port 80 in the container.


Known limitations, use cases, and workarounds

There is no docker0 bridge on Windows


I cannot ping my containers


Per-container IP addressing is not possible


Use cases and workarounds

I want to connect from a container to a service on the host

The host has a changing IP address (or none if you have no network access).

We recommend that you connect to the special DNS name host.docker.internal

which resolves to the internal IP address used by the host.

This is for development purpose and will not work in a production environment outside of Docker Desktop for Windows.


You can also reach the gateway using gateway.docker.internal.


Example:

1. Run the following command to start a simple HTTP server on port 8000.

python -m http.server 8000

2. Now, run a container, install curl, and try to connect to the host using the following commands:

$ docker run --rm -it alpine sh
# apk add curl
# curl http://gateway.docker.internal:8000
# exit

curl http://host.docker.internal:8000
curl http://gateway.docker.internal:8000

I want to connect to a container from Windows

Port forwarding works for localhost; --publish, -p, or -P all work.

Ports exposed from Linux are forwarded to the host.

Our current recommendation is to publish a port, or to connect from another container.

This is what you need to do even on Linux if the container is on an overlay network, not a bridge network, as these are not routed.

For example, to run an nginx webserver:

$ docker run -d -p 80:80 --name webserver nginx

To clarify the syntax, the following two commands both publish container's port 80 to host's port 8000:

$ docker run --publish 8000:80 --name webserver nginx

$ docker run -p 8000:80 --name webserver nginx

To publish all ports, use the -P flag.

For example, the following command starts a container (in detached mode) and the -P flag publishes all exposed ports of the container to random ports on the host.

$ docker run -d -P --name webserver nginx


'OS > Docker' 카테고리의 다른 글

Docker Desktop Tips  (0) 2021.10.12

docker 설치 및 확인

https://docs.confluent.io/4.0.0/installation/docker/docs/quickstart.html


Docker Quick Start | Confluent Platform 4.0.0

Important You are viewing documentation for an older version of Confluent Platform. For the latest, click here. Docker Quick Start This quick start provides a basic guide for deploying a Kafka cluster along with all Confluent Platform components in your Do

docs.confluent.io

2. Clone the Confluent Platform Docker Images Github Repository.

...\confluent> git clone https://github.com/confluentinc/cp-docker-images

3. Start the ZooKeeper and Kafka containers in detached mode (-d).

Run this comand from the directory that contains the docker-compose.yml file.

> cd <path-to-cp-docker-images>/examples/kafka-single-node/
> docker-compose up -d

> docker-compose logs zookeeper | grep -i binding
> docker-compose logs kafka | grep -i started


아래는 이전에 했던 방법.


docker-compose 이용

https://github.com/conduktor/kafka-stack-docker-compose


GitHub - conduktor/kafka-stack-docker-compose: docker compose files to create a fully working kafka stack

docker compose files to create a fully working kafka stack - GitHub - conduktor/kafka-stack-docker-compose: docker compose files to create a fully working kafka stack

github.com

Dev Environments > Create


Enter the Git Repository

https://github.com/conduktor/kafka-stack-docker-compose.git

OPEN IN VSCODE

yml 파일 작성하기

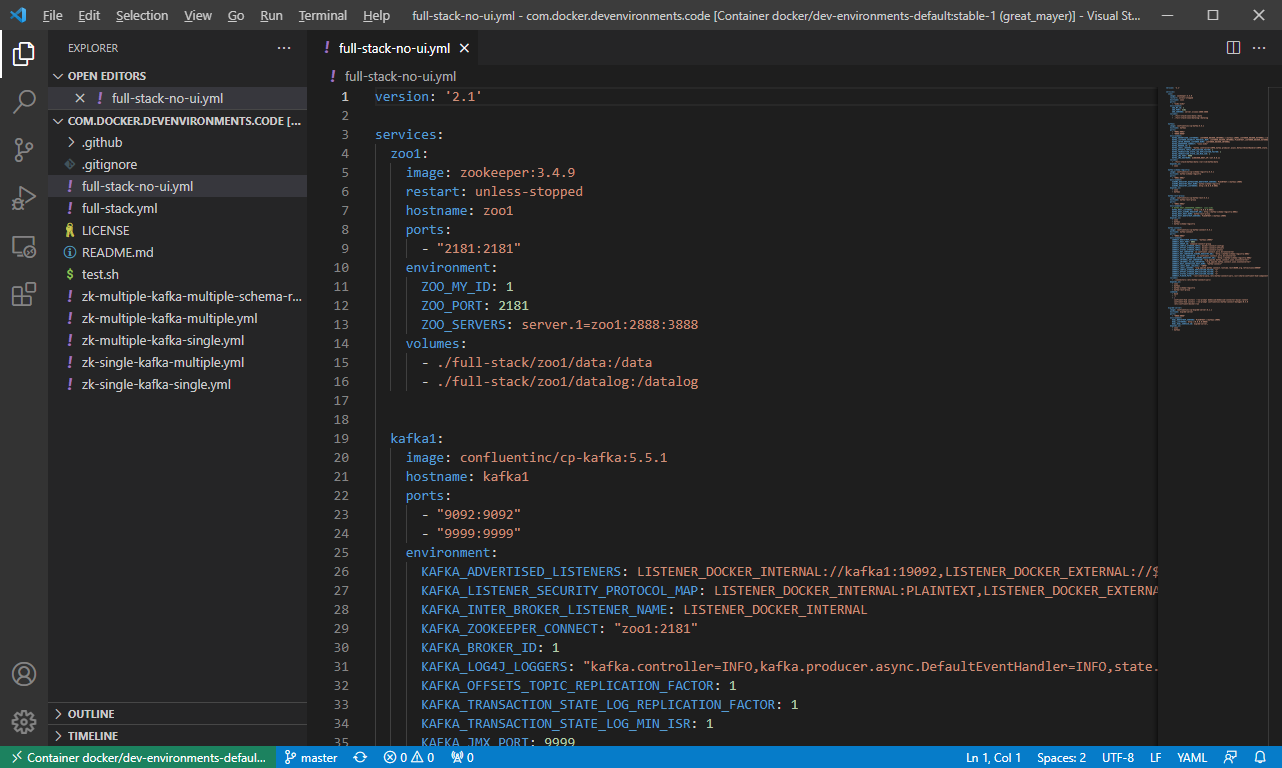
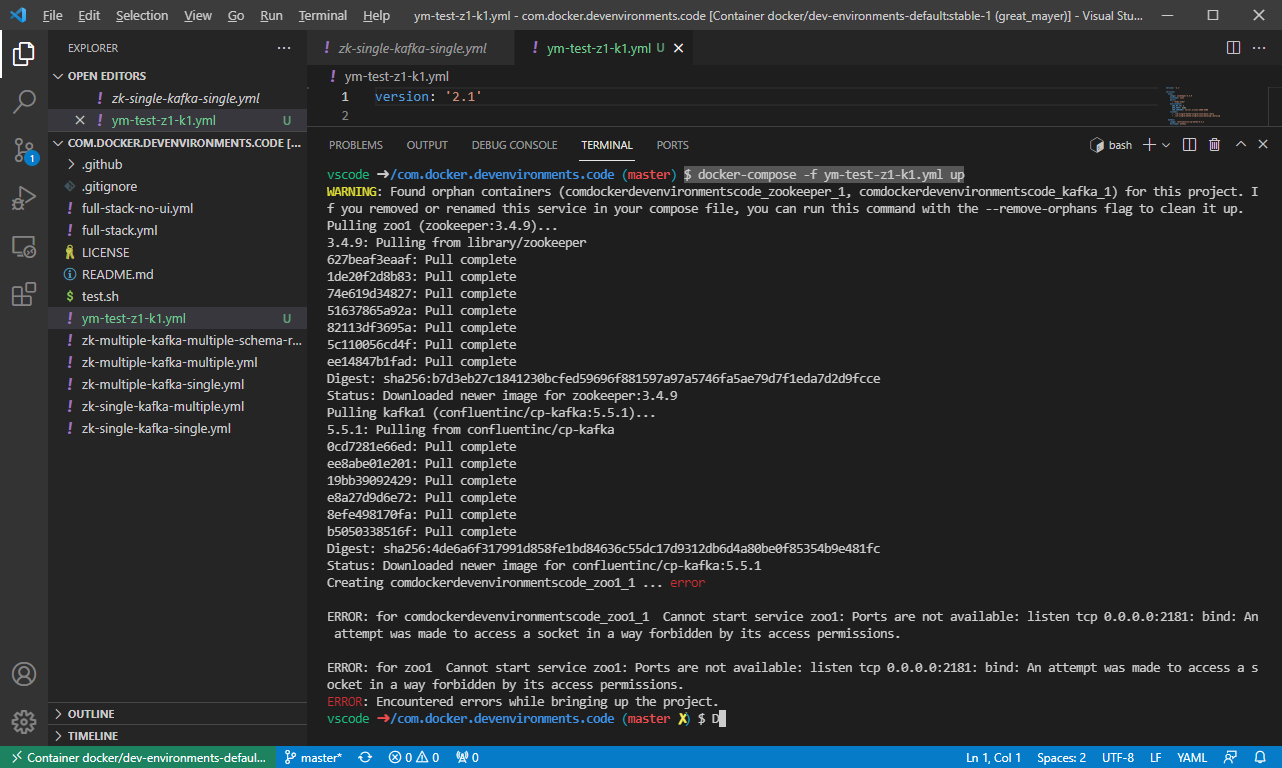
zk-single-kafka-single.yml을 기반으로 ym-test-z1-k1.yml 작성

$ docker-compose -f ym-test-z1-k1.yml up

vscode ➜ /com.docker.devenvironments.code (master ✗) $ sudo chmod 666 /var/run/docker.sock
vscode ➜ /com.docker.devenvironments.code (master ✗) $ export DOCKER_HOST_IP=192.168.65.100
vscode ➜ /com.docker.devenvironments.code (master ✗) $ docker-compose -f ym-test-z1-k1.yml up
Starting comdockerdevenvironmentscode_zoo1_1 ... done
Starting comdockerdevenvironmentscode_kafka1_1 ... error

ERROR: for comdockerdevenvironmentscode_kafka1_1  Cannot start service kafka1: Ports are not available: listen tcp 0.0.0.0:9999: bind: An attempt was made to access a socket in a way forbidden by its access permissions.

ERROR: for kafka1  Cannot start service kafka1: Ports are not available: listen tcp 0.0.0.0:9999: bind: An attempt was made to access a socket in a way forbidden by its access permissions.
ERROR: Encountered errors while bringing up the project.


Docker subnet 설정

$ sudo chmod 666 /var/run/docker.sock
$ export DOCKER_HOST_IP=192.168.65.100
$ docker-compose -f zk-single-kafka-single.yml up


'OS > Windows' 카테고리의 다른 글

How to build the HackRF on Windows  (0) 2023.08.29

Windows 기능 설정

가상화 지원 확인

System requirements

WSL 2 backend / Hyper-V backend and Windows Containers

  • Enable the WSL 2 feature on Windows.
  • Hyper-V and Containers Windows features must be enabled.
  • The following H/W prerequisites are required to successfully run WSL 2/Client Hyper-V on Windows 10:
    • 64-bit processor with Second Level Address Translation (SLAT)
    • 4GB system RAM
    • BIOS-level hardware virtualization support must be enabled in the BOIS settings.
  • Download and install the Linux kernel update package.


  •  

'OS > Docker' 카테고리의 다른 글

Networking features in Docker Desktop for Windows  (0) 2021.10.13

커널에 대한 정보

uname -a

OS 버전에 대한 정보

:~$ cat /etc/issue
Ubuntu 20.04.3 LTS \n \l

:~$ cat /etc/*release*
DISTRIB_ID=Ubuntu
DISTRIB_RELEASE=20.04
DISTRIB_CODENAME=focal
DISTRIB_DESCRIPTION="Ubuntu 20.04.3 LTS"
NAME="Ubuntu"
VERSION="20.04.3 LTS (Focal Fossa)"
ID=ubuntu
ID_LIKE=debian
PRETTY_NAME="Ubuntu 20.04.3 LTS"
VERSION_ID="20.04"
HOME_URL="https://www.ubuntu.com/"
SUPPORT_URL="https://help.ubuntu.com/"
BUG_REPORT_URL="https://bugs.launchpad.net/ubuntu/"
PRIVACY_POLICY_URL="https://www.ubuntu.com/legal/terms-and-policies/privacy-policy"
VERSION_CODENAME=focal
UBUNTU_CODENAME=focal

:~$ getconf LONG_BIT
64

:~$ lsb_release -a
No LSB modules are available.
Distributor ID: Ubuntu
Description:    Ubuntu 20.04.3 LTS
Release:        20.04
Codename:       focal

'OS > Linux' 카테고리의 다른 글

CMake Install  (0) 2022.10.01
VSCode: ssh로 접근해서 편집된 파일 저장 시 permission 문제  (0) 2022.08.22
glib/streamer install  (0) 2021.11.15
WSL2에서 GUI 사용하기  (0) 2021.10.19
Installing Linux Developer Tools  (0) 2021.10.19
#include <stdlib.h>
#include <libloaderapi.h>

LPCWSTR GetThisDllPath()
{
    static wchar_t s_wszMyPath[_MAX_PATH] = { 0, };

    if (!s_wszThisPath[0])
    {
        DWORD dwFlags = GET_MODULE_HANDLE_EX_FLAG_FROM_ADDRESS
                      | GET_MODULE_HANDLE_EX_FLAG_UNCHANGED_REFCOUNT;
        HMODULE hModule;
    
        if (!::GetModuleHandleExW(dwFlags, (LPCWSTR)&GetThisDllPath, &hModule))
        {
            int rv = ::GetLastError();
            fprintf(stderr, "GetModuleHandleEx failed, error = %d\r\n", rv);
            return nullptr;
        }
        if (!::GetModuleFileNameW(hModule, s_wszMyPath, _MAX_PATH))
        {
            int rv = ::GetLastError();
            fprintf(stderr, "GetModuleFileName failed, error = %d\r\n", rv);
            return nullptr;
        }
    }
    
    return s_wszThisPath;
}

#include "pch.h"

wchar_t s_wszMyPath[_MAX_PATH];

BOOL APIENTRY DllMain(
    HMODULE hModule,
    DWORD  ul_reason_for_call,
    LPVOID lpReserved)
{
    switch (ul_reason_for_call)
    {
    case DLL_PROCESS_ATTACH:
        ::GetModuleFileNameW(hModule, s_wszMyPath, _MAX_PATH);
        break;
    case DLL_THREAD_ATTACH:
    case DLL_THREAD_DETACH:
    case DLL_PROCESS_DETACH:
        break;
    }
    return TRUE;
}

HMOUDLE hModule = &__ImageBase;
wchar_t wszMyPath[_MAX_PATH];

::GetModuleFileNameW(hModule, wszMyPath, _MAX_PATH);


'C, C++' 카테고리의 다른 글

xlnt - XLSX 파일 다루기  (0) 2022.12.22
To install the MinGW-w64 toolchain  (0) 2022.10.28
문자열 구분자로 분리  (0) 2021.10.20
VSCode + vcpkg  (0) 2021.10.19
ticktock  (0) 2021.08.15

원본: http://www.pixelsham.com/2020/08/03/resolution-charts/


Resolution Charts

  Resolution – Aspect Ratio 4:03 16:09 16:10 3:02 5:03 5:04 CGA 320 x 200 QVGA 320 x 240 VGA (SD, Standard Definition) 640 x 480 NTSC 720 x 480 WVGA 854 x 450 WVGA 800 x 480 PAL 768 x 576 SVGA…

www.pixelsham.com

Aspect Ratio 4:3 (1.33:1) 16:9 (1.78:1) 16:10 3:2 5:3 5:4
CGA     320 x 200      
QVGA 320 x 240          
VGA(SD) 640 x 480          
NTSC       720 x 480    
WVGA   854 x 450     800 x 480  
PAL 768 x 576          
SVGA 800 x 600          
XGA 1024 x 768          
HD720(720P)   1280 x 720        
WXGA     1280 x 800   1280 x 768  
SXGA           1280 x 1024
SXGA+ 1400 x 1050          
WSXGA     1680 x 1050      
UXGA(2MP) 1600 x 1200          
HD1080(1080P, FHD)   1920 x 1080        
WUXGA     1920 x 1200      
2K   2048 x (any)        
QWXGA   2048 x 1152        
QXGA(3MP) 2048 x 1536          
WQXGA     2560 x 1600      
QHD       2560 x 1440    
QSXGA(5MP)           2560 x 2048
4K UHD   3840 x 2160        
QUXGA+     3840 x 2400      
IMAX 3D 4096 x 3072          
8K UHD   7680 x 4320        
10K HD   10240 x 4320        
16K   15360 x 8640        

'Media' 카테고리의 다른 글

RTSP  (0) 2021.08.15

사용자 객체 디버거 표시 속성

    [StructLayout(LayoutKind.Sequential, Pack = 1)]
    [DebuggerDisplay("k4a_quaternion_st: wxyz({w}, {x}, {y}, {z})")]
    public readonly struct k4a_quaternion_st
    {
        public readonly float w;
        public readonly float x;
        public readonly float y;
        public readonly float z;

        public k4a_quaternion_st(float w, float x, float y, float z)
        {
            this.w = w;
            this.x = x;
            this.y = y;
            this.z = z;
        }

        public static implicit operator Quaternion(k4a_quaternion_st q)
        {
            return new Quaternion(q.x, q.y, q.z, q.w);
        }

        public static implicit operator k4a_quaternion_st(Quaternion q)
        {
            return new k4a_quaternion_st(q.W, q.X, q.Y, q.Z);
        }
    }

'.NET > C#' 카테고리의 다른 글

Concurrency (동시성)  (0) 2023.08.16
Marshaling: 복사 및 고정  (0) 2021.10.15
Array Marshaling  (0) 2021.10.15
Comparisons and Sorts  (0) 2021.10.15
Equals, IEquatable<T>  (0) 2021.08.15

+ Recent posts